39일차(2) : Vue.js 예제(3)
- Component
Step07_component
<!DOCTYPE html>
<html lang="en">
<head>
    <meta charset="UTF-8">
    <meta http-equiv="X-UA-Compatible" content="IE=edge">
    <meta name="viewport" content="width=device-width, initial-scale=1.0">
    <title>Step07_component.html</title>
    <style>
        .box{
            width: 100px;
            height: 100px;
            background-color: yellow;
            border: 1px solid red;
        }
    </style>
</head>
<body>
    <h1>component 정의하고 사용하기</h1>
    <div id="app">
        <my-component></my-component>
        <my-component></my-component>
        <my-component></my-component>
        <input type="text" v-model="msg"/>
        <your-component v-bind:greet="'안녕하세요!'"></your-component>
        <your-component v-bind:greet="msg"></your-component>
    </div>
    <script src="https://cdn.jsdelivr.net/npm/vue/dist/vue.js"></script>
    <script>
        let app=new Vue({
            el:"#app",
            data:{
            	msg:""
            },
            components:{
                "my-component":{
                    template:"<div class='box'> box </div>"
                },
                "your-component":{
                    template:"<div class='box'>{{greet}}</div>",
                    props:["greet"]
                }
            }
        });
    </script>
</body>
</html>
- html 코드에서 보면 <my-component> 라는 요소로 만들어놓음

- 브라우저에서 열어보면 div로 바뀌어 있다.
- client side rendering이다. vue가 저렇게 바꾸어놓았다.
components:{ } 라는 것도 있다.(computed와 비슷하게)
- 요소 이름을 쓰고, 템플릿을 안에 미리 준비해놓는다.
- 자주 사용하는 틀을 만들어 놓고 끼워넣을 수 있다.
ex) navbar, footer 등 필요한 페이지에 바로바로 집어넣기 가능!
- 속성값으로 데이터(값)을 전달받을 수도 있다.
- 이 component는 내부에서 사용할 값을 외부에서 공급받을 수 있다.
v-bind:greet=" "
- greet은 사용자 정의 속성이다. 전달받을 property명을 저렇게 정해놓았기 때문이다.
- 재활용, 재사용 가능한 component를 미리 만들어놓을 수 있다.
- my-com의 box는 고정되어 있지만,
your-com의 greet 부분의 정보는 외부에서 받아서 쓰겠다는 의미!
- 속성값 부분에 문자열을 받아서 쓸 수도 있고, 사용자로부터 입력받은 것을 넣을수도 있다.
- id="app"은 root component 라고 부른다.
- 이곳으로부터 '안녕하세요!'라는 문자열을 전달받아서 넣은 것이다.

- 사용자가 입력한 내용이 전달되도록 할 수도 있다.
- msg 모델에 있는 것을 받아서 your-component에 전달도 가능!
Step07_component2
<!DOCTYPE html>
<html lang="en">
<head>
    <meta charset="UTF-8">
    <meta http-equiv="X-UA-Compatible" content="IE=edge">
    <meta name="viewport" content="width=device-width, initial-scale=1.0">
    <title>Step07_component2.html</title>
</head>
<body>
    <h1>component 사용예제</h1>
    <div id="app">
        <h2>친구 목록 입니다.</h2>
        <friends-component v-bind:friends="friends"></friends-component>

        <h2>동물 친구 목록 입니다.</h2>
        <friends-component v-bind:friends="friends2"></friends-component>
    </div>
    <script src="https://cdn.jsdelivr.net/npm/vue/dist/vue.js"></script>
    <script>
        let app=new Vue({
            el:"#app",
            data:{
                friends:["바나나","딸기","복숭아"],
                friends2:["강아지","고양이","두더지"]
            },
            components:{
                "friends-component":{
                    template:`
                        <ul>
                            <li v-for="item in friends">{{item}}</li>
                        </ul>
                    `,
                    props:["friends"]
                }
            }
        });
    </script>
</body>
</html>
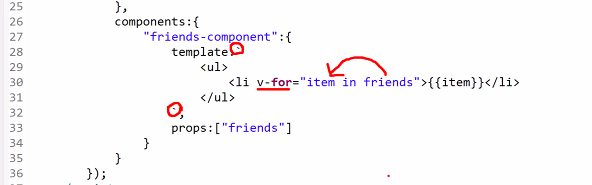
- `` 백틱을 사용하면 ' ' 보다 편리하게 감쌀 수 있다.
- v-for을 사용해서 for문 돌 준비도 되어있다.
- friends[] / friends2[] 배열을 보면,
동일한 component여도 data에서 다른것을 전달하면 다른 내용이 나온다.
props:["friends"]
- friends라는 property를 전달하도록 정해둔 것
Step07_component03
<!DOCTYPE html>
<html lang="en">
<head>
    <meta charset="UTF-8">
    <meta http-equiv="X-UA-Compatible" content="IE=edge">
    <meta name="viewport" content="width=device-width, initial-scale=1.0">
    <title>Step07_component3.html</title>
</head>
<body>
    <h1>component 테스트</h1>
    <div id="app">
        <p> 오늘의 인사 : <strong>{{greet}}</strong></p>
        <my-component></my-component>
    </div>
    <div id="app2">
        <p> 오늘의 인사 : <strong>{{greet}}</strong></p>
        <my-component></my-component>
    </div>
    <div id="app3">
        <p> 오늘의 인사 : <strong>{{greet}}</strong></p>
        <my-component></my-component>
    </div>
    <script src="https://cdn.jsdelivr.net/npm/vue/dist/vue.js"></script>
    <script>
        /*
            재사용 가능한 컴포넌트를 전역으로 정의하기
            Vue.component("컴포넌트 이름", {컴포넌트 데이터});
        */
        Vue.component("my-component", {
            template:"<div>{{msg}}</div>",
            data(){
                return {
                    msg:"div 입니다."
                };
            }
        });

        let app=new Vue({
            el:"#app",
            data:{
                greet:"안녕하세요!"
            }
        });
        let app2=new Vue({
            el:"#app2",
            data:function(){
                return {
                    greet:"안녕하세요!"
                };
            }
        });
        let app3=new Vue({
            el:"#app3",
            data(){
                return {
                    greet:"안녕하세요!"
                };
            }
        });
    </script>
</body>
</html>
- 사용 가능한 컴포넌트를 전역으로 정의하기
- 어떤 Vue 에서든지 사용할 수 있는 컴포넌트

- 글로벌영역에서 정의하는 것의 장점!

- 1,2,3 각각의 vue 객체가 다름에도 불구하고 동일한 component를 쓸 수 있다.
- component도 자신만의 고유한 메소드를 가질 수 있다.
- 대신 component는 data를 작성할 수 없다.

- root component 에는 위와 같이 쓸 수 있지만
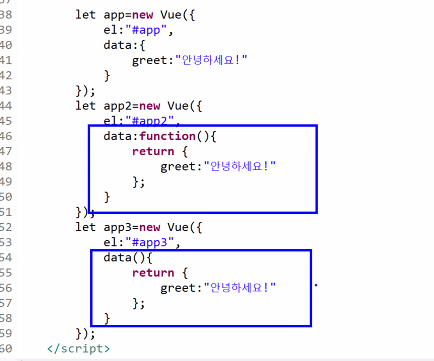
- 자식 형태는 반드시 이렇게 작성해야 한다.
- return () 의 괄호안의 내용이 모델이라고 생각하면 된다.
Step07_component4
<!DOCTYPE html>
<html lang="en">
<head>
    <meta charset="UTF-8">
    <meta http-equiv="X-UA-Compatible" content="IE=edge">
    <meta name="viewport" content="width=device-width, initial-scale=1.0">
    <title>Step07_component4.html</title>
</head>
<body>
    <h1>component 테스트</h1>
    <div id="app">
        <fortune-component v-bind:fortune="'동쪽으로 가면 귀인을 만나요'"></fortune-component>
        <fortune-component v-bind:fortune="fortune"></fortune-component>
        <input type="text" v-model="fortune" >
    </div>
    <script src="https://cdn.jsdelivr.net/npm/vue/dist/vue.js"></script>
    <script>
        /*
            1. props:["fortune"]

            fortune 이라는 이름의 props 를 받을 준비가 되어 있는 컴포넌트

            2. props 를 전달하는 방법

            <자식컴포넌트명 v-bind:프로퍼티명="값">
            <fortune-component v-bind:fortune="fortune">

        */
        Vue.component("fortune-component",{
            template:`
                <div>
                    <h2>오늘의 운세</h2>
                    <p>{{fortune}}</p>
                </div>
            `,
            props:["fortune"]
        });

        let app=new Vue({
            el:"#app",
            data(){
                return {
                    fortune:"북쪽으로 가면 현진이를 만나게 될꺼에요!"
                };
            }
        });
    </script>
</body>
</html>

- 고정된 문자열을 만들어서 전달한 것과
- fortune이라는 모델을 전달한 것 (모델이 바뀌면 자식 컴포넌트가 사용하는 값도 바뀐다.)
- 전달받을 property를 {{ fortune }} 안에서 사용
< 자식 컴포넌트명 v-bind : Property명 = "value" >


- root component에서 자식 component로 바로 전달할 수 있다.
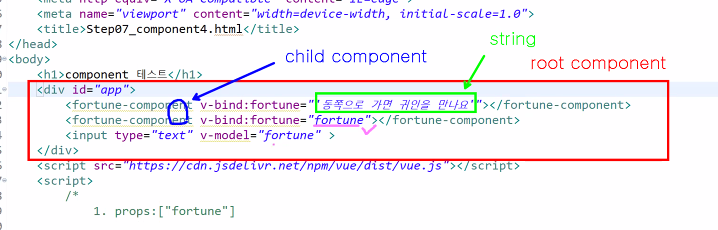
- 자식component는 root안에 들어있는 컴포넌트!
- String type을 전달하고 있다.
- 부모component 가 갖고 있는 fortune이라는 모델을 자식component에 전달해주는 것이다.

- div 안에 이런 모양을 갖고 있는 것으로 나온다.
- 둘다 fortune component인데 innerText가 다르다.
1번째) 직접 만들어서 전달
2번째) forturne이라는 모델에 있는 값을 전달

2번째의 경우) 모델을 전달하기 때문에, 모델이 바뀌면 값이 수정된다.
- 부모component 에서 갖고있는 모델을 전달 → 부모 component에서 수정하면 자식component의 값도 자동 수정된다.
- 부모가 갖고있는 모델을 자식component에 property로 전달한 것.
- 자식 컴포넌트에서는 받아서 innerTerxt로 사용하는 것이다.
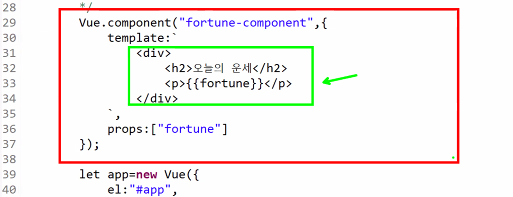
- template 안에 자주 사용되는 내용을 넣어두면 효율적으로 사용할 수 있다.
- 특정 내용을 매번 새로 작성하지 않고, 미리 정의되어 있는 것을 불러다 쓰는 것으로 대체 가능!

- 이렇게 작성하는것도 가능하다. fortune도 모델처럼 사용하는 것!
(root component에서만 쓸 수 있다.)

- component모델을 사용할 때는
위와 같은 자식component에서는 이렇게 작성할 수 없다.(위에 있는 박스는 저렇게 작성 불가 X)

data:function(){}

data(){
	return{fortune: "" );
)
- 이렇게 작성할 수도 있다. 위의 두 코드는 같은 것!
Step07_component5
<!DOCTYPE html>
<html lang="en">
<head>
    <meta charset="UTF-8">
    <meta http-equiv="X-UA-Compatible" content="IE=edge">
    <meta name="viewport" content="width=device-width, initial-scale=1.0">
    <title>Step07_component5.html</title>
</head>
<body>
    <h1>component 테스트</h1>
    <div id="app">
        <!--
            props 이름이 camel case 로 작성되어 있으면 kebab case 로 props 를
            전달해야 한다.
        -->
        <fortune-component v-bind:fortune-today="fortune"></fortune-component>
    </div>
    <script src="https://cdn.jsdelivr.net/npm/vue/dist/vue.js"></script>
    <script>

        Vue.component("fortune-component",{
            template:`
                <div>
                    <h2>오늘의 운세</h2>
                    <p>{{fortuneToday}}</p>
                </div>
            `,
            props:["fortuneToday"]
        });

        let app=new Vue({
            el:"#app",
            data(){
                return {
                    fortune:"북쪽으로 가면 규환이를 만나게 될꺼에요!"
                };
            }
        });
    </script>
</body>
</html>

- props의 이름이 camel 로 되어있으면 kebab 으로 변경하기
- 헷갈리면 양쪽 다 그냥 케밥으로 쓰기!
Step07_example
<!DOCTYPE html>
<html lang="en">
<head>
    <meta charset="UTF-8">
    <meta http-equiv="X-UA-Compatible" content="IE=edge">
    <meta name="viewport" content="width=device-width, initial-scale=1.0">
    <title>Step07_example.html</title>
    <link href="https://cdn.jsdelivr.net/npm/bootstrap@5.0.2/dist/css/bootstrap.min.css" rel="stylesheet" integrity="sha384-EVSTQN3/azprG1Anm3QDgpJLIm9Nao0Yz1ztcQTwFspd3yD65VohhpuuCOmLASjC" crossorigin="anonymous">
</head>
<body>
    <div class="container" id="app">
        <h1>component 예제</h1>
        <div class="row">
            <figure-component
                v-for="(item, index) in imageList"
                v-bind:imageinfo="item"
                v-bind:key="index"></figure-component>
        </div>
        <h1>bind:src 가 필요한 이유</h1>
        <p>{{path}}</p>
        <p v-text="path"></p>
        <!--
        	<img src="{{모델명}}" >  형태로는 사용이 불가하고
        	아래와 같이 v-bind:src="모델명" 형식을 사용해야 한다.
         -->
        <img v-bind:src="path"/>
    </div>
    <script src="https://cdn.jsdelivr.net/npm/vue/dist/vue.js"></script>
    <script>
        Vue.component("figure-component",{
            template:`
            <div class="col">
                <figure class="figure">
                    <img v-bind:src="imageinfo.src" class="figure-img img-fluid rounded">
                    <figcaption class="figure-caption">{{imageinfo.caption}}</figcaption>
                </figure>
            </div>
            `,
            props:["imageinfo"]
        });

        let app=new Vue({
            el:"#app",
            data(){
                return {
                    imageList:[
                        {src:"images/image1.png", caption:"어쩌구... 저쩌구..."},
                        {src:"images/image2.png", caption:"어쩌구... 저쩌구..."},
                        {src:"images/image3.png", caption:"어쩌구... 저쩌구..."},
                        {src:"images/image4.png", caption:"어쩌구... 저쩌구..."}
                    ],
                    path:"images/kim1.png"
                };
            }
        });
    </script>
</body>
</html>

- figure component도 for문으로 반복문 돌면서 읽어올 수 있다.
- '이미지 경로'와 '설명'이 있어야 한다 (imageinfo, caption)
- imageinfo는 object이다. .점 찍어서 참조 가능
<img v-bind:src="이미지명">
- 이미지는 {{모델명}} 으로는 출력되지 않는다.
'국비교육(22-23)' 카테고리의 다른 글
| 41일차(1)/GitHub : 외부 저장소에서 Fork-Clone 하기 / Pull Request 사용법 (0) | 2022.12.05 |
|---|---|
| 40일차(1) : Vue.js 예제(4) (0) | 2022.12.04 |
| 39일차(1) : javascript로 작성했던 폼 Vue.js로 수정하기 (0) | 2022.12.01 |
| 38일차(3) : Vue.js 예제(2) (0) | 2022.12.01 |
| 38일차(2) : Vue.js 예제(1) (1) | 2022.12.01 |