95일차(1)/Android App(59) : mp3 파일 재생 예제 / 곡 목록 출력
- Spring Boot 와 안드로이드, 웹서버 연결하는 방법 학습
- 전부 외우는 것이 아니라 각 코드 블록의 역할과 기능을 이해할 수 있으면 된다.

- @ResponseBody로 list, dto, map 등을 리턴하게 되면 JSON 문자열이 응답된다.
- dao로 음악 목록을 가져와서 응답하면 [ ] , { } 형태의 문자열이 응답된다.

- 웹브라우저와 동일하게 안드로이드도 403 을 응답받는다. (로그인하지 않은경우)
- Spring Framework가 동작하는 와중에 개입하는 인터셉터가 설정되어있기 때문에

- LoginInterceptor, MobileLoginInterceptor 가 bean이 되어있다.
- 필요한 것을 @Configuration, @Autowired 로 주입받아서 사용
- 어떤 요청에 동작하고, 어떤 요청을 배제할것인지 작성하는 것!

- 이 패턴에 대해 mLoginInterceptor가 작용해서 안드로이드에서도 403을 내보내는 것이다.

- @Component로 bean으로 만들기. 객체가 생성되고 그 bean을 spring에서 관리한다.
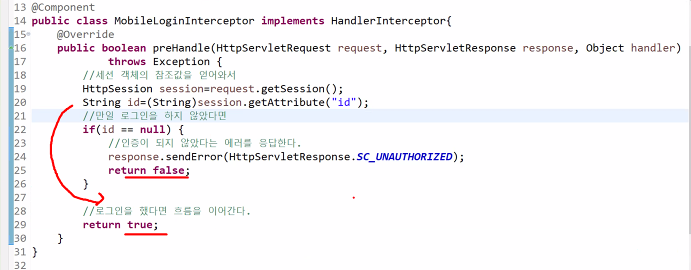
- 인터셉터는 preHandle, postHandle, afterCompletion 등 원하는 시점에 개입할 수 있다.
- prehandle 인자로는 req, res, object가 전달된다.
- session 객체를 사용해서 "id"로 저장된 값이 있는지 확인
- 저장된 값이 없다면 컨트롤러가 응답하기전에 if문에서 먼저 응답해버린다.
- 웹브라우저는 sessionDB에서 sessionID를 부여하고 관리하며 사용자를 구분한다.

- 인자로 전달된 response는 응답을 할 수 있는 객체이다.
- response.sendError() 첫번째 메소드를 사용해서 에러를 응답했다. (약속된 상수 코드 사용)
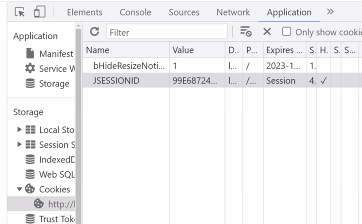
- 로그인하면 검사창에서 이렇게 볼 수 있다. 브라우저에서 쿠키를 응답한 것이다.

- 다른 브라우저(엣지)를 열어보면 엣지에서는 다른 세션아이디를 발급받은 것을 볼 수 있다.
- 경로 요청을 했을 때 세션아이디를 발급받아서 가지고 있는 것이다.
- 로그인하면 이 세션아이디를 가지고 로그인한 사용자를 기억하게 된다.
- 이것이 서버가 클라이언트를 구분하는 방법이다.
- 안드로이드 MainActivity
- onStart() 메소드 안에서 로그인체크를 해서-> onPostExecute에서 확인해서 처리한다.
- 로그인하면 웹서버로부터 JSON 문자열을 받아와서 재생목록을 출력한다.

- [ ] JSONArray, { } JSONObject 사용해서 값 읽어내기!

- 저 JSON 문자열의 모든 데이터를 반복문 돌면서 java 객체에 담아준다.
- JSON 문자열을 List<MusicDto> 로 바꾼 것! 이것을 JSON 문자열을 파싱한다고 한다.
- 앱에서 사용하기 편리한 형태로 변환한 것이다.

- 인덱스번호(position) 을 사용해서 파일명을 알아내서,
파일명으로 경로를 얻어서 service 메소드에 전달한다.

- 이것은 동기화 작업이기 때문에 앞선 작업이 끝나야 실행된다.
서버로부터 이미지를 로딩해서 가져오는 것이라 조금 무거운 작업이다.
- 가능하면 이것도 비동기 작업으로 빼는 것이 좋다.

- 지금 상태에서는 백 버튼으로 음악 앱을 빠져나오면 음악이 정지된다.
- bindService 를 사용해서 바인딩을 시작한다는 것은,
즉 unbindService() 되는 시점에 바인드가 해제된다는 것이다..

- 서비스를 start시키려면 intent가 필요하고, 이 intent를 이용해서 StartService로 시작시킴

- 그런데 MusicService를 보면 intent에서 Action을 가져와야 하는 지점이 있다.
- 액션 자체는 중요하지 않지만, 이곳에 액션이 없으면 NullPointException이 발생한다.

intent.setAction("Dummy Action");
- 이렇게 넣어준다. 실제로 이 액션을 사용하지는 않는다. NullpointException를 방지하기 위한 코드이다.
- 위에서 삭제했던 bindService() 메소드는 로그인체크를 해서 성공되었을 때 그때 바인딩한다.

- 여기에서는 startService() 만 시킨다. 이미 start 되어있다면 다시 시작되지는 않는다.

- 사용하지 않는 액션을 넣어준 것은 서비스의 이 메소드를 호출하기 위함이다.

- 이렇게 onPostExecute() 에서 service바인딩을 한다.
- 이렇게 하면 화면을 꺼도 음악이 계속 재생된다.
- 알림 창의 제목을 실제로 현재 재생하고있는 곡으로 띄우고 싶다면
서비스(MusicService)에서도 현재 재생하고 있는 곡의 정보를 알아야 한다.
- 다음 곡 재생하기, 재생이 끝나면 멈추기 위해서는 곡 목록에 대한 정보를 서비스도 갖고있어야 한다.
MusicService
package com.example.step23mp3player;
import android.app.Notification;
import android.app.PendingIntent;
import android.app.Service;
import android.content.Intent;
import android.content.pm.PackageManager;
import android.media.AudioManager;
import android.media.MediaPlayer;
import android.os.Binder;
import android.os.Handler;
import android.os.IBinder;
import android.os.Message;
import android.util.Log;
import androidx.annotation.NonNull;
import androidx.core.app.ActivityCompat;
import androidx.core.app.NotificationCompat;
import androidx.core.app.NotificationManagerCompat;
import java.util.List;
import java.util.concurrent.TimeUnit;
/*
MusicService를 이용해서 음악을 재생하는 방법
- initMusic() 메소드를 호출하면서 음원의 위치를 넣어주고
- 음원 로딩이 완료되면 자동으로 play 된다.
*/
public class MusicService extends Service implements MediaPlayer.OnPreparedListener, MediaPlayer.OnCompletionListener {
//필요한 필드 정의하기
MediaPlayer mp;
boolean isPrepared; //음원 재생 준비가 완료되었는지 여부
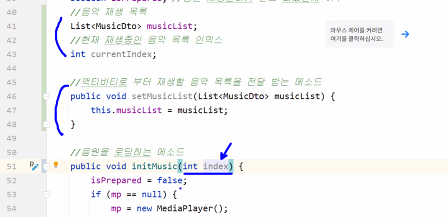
//음악 재생 목록
List<MusicDto> musicList;
//현재 재생중인 음악 목록 인덱스
int currentIndex;
//액티비티로부터 재생할 음악목록을 전달받는 메소드
public void setMusicList(List<MusicDto> musicList) {
this.musicList = musicList;
}
//음원을 로딩하는 메소드 url을 넣어주면 해당 url의 음악을 로딩하는 메소드
public void initMusic(int index) {
//현재 재생중인 인덱스 수정
currentIndex=index;
isPrepared = false;
if (mp == null) {
mp = new MediaPlayer();
mp.setAudioStreamType(AudioManager.STREAM_MUSIC);
mp.setOnPreparedListener(this); //음원 로딩이 완료되었는지 감시할 리스너 등록
mp.setOnCompletionListener(this);
mp.setLooping(false);
}
//만일 현재 재생중이면
if (mp.isPlaying()) {
mp.stop(); //재생을 중지하고
}
mp.reset(); //초기화
try {
String url=AppConstants.MUSIC_URL+musicList.get(index).getSaveFileName();
mp.setDataSource(url);
} catch (Exception e) {
Log.e("initMusic()", e.getMessage());
}
//비동기로 로딩을 시킨다.
mp.prepareAsync();
}
//재생하는 메소드
public void playMusic() {
mp.start();
}
//일시정지하는 메소드
public void pauseMusic() {
mp.pause();
}
//정지하는 메소드
public void stopMusic() {
mp.stop();
}
//재생이 준비되었는지 여부를 리턴하는 메소드
public boolean isPrepared() {
return isPrepared;
}
//MediaPlayer 객체의 참조값을 리턴하는 메소드
public MediaPlayer getMp() {
return mp;
}
//서비스가 최초 활성화될 때 한번 호출되는 메소드
@Override
public void onCreate() {
super.onCreate();
}
//최초 활성화 혹은 이미 활성화된 이후 이 서비스를 활성화 하는 Intent가 도착하면 호출되는 메소드
@Override
public int onStartCommand(Intent intent, int flags, int startId) {
//알림에 띄워진 액션 버튼을 눌렀을때 분기해서 필요한 동작을 한다.
switch (intent.getAction()) {
case AppConstants.ACTION_PLAY:
Log.d("onStartCommand()", "play!");
playMusic();
break;
case AppConstants.ACTION_PAUSE:
Log.d("onStartCommand()", "pause!");
pauseMusic();
break;
case AppConstants.ACTION_STOP:
Log.d("onStartCommand()", "stop!");
stopMusic();
break;
}
return START_NOT_STICKY;
}
//음원 재생이 완료되었을 때 호출되는 메소드
@Override
public void onCompletion(MediaPlayer mp) {
//재생할 음악 목록의 마지막 인덱스
int lastIndex=musicList.size();
//만일 현재 재생중인 인덱스가 마지막 번째 인덱스보다 작다면(마지막 인덱스가 아니라면)
if(currentIndex < lastIndex){
currentIndex++;
initMusic(currentIndex);
}else{
//만일 무한 플레이를 하려면
currentIndex=0;
initMusic(currentIndex);
}
}
//Binder 클래스를 상속받아서 LocalBinder 클래스를 정의한다.
public class LocalBinder extends Binder {
//서비스의 참조값을 리턴해주는 메소드
public MusicService getService() {
Log.e("####", "리턴함");
return MusicService.this;
}
}
//필드에 바인더 객체의 참조값 넣어두기
final IBinder binder = new LocalBinder();
//어디에선가(액티비티) 바인딩(연결)이 되면 호출되는 메소드
@Override
public IBinder onBind(Intent intent) {
return binder;
}
//새로운 음원 로딩이 완료되면 호출되는 메소드
@Override
public void onPrepared(MediaPlayer mp) {
//재생할 준비가 되었다고 상태값을 바꿔준다.
isPrepared = true;
//준비가 되면 자동으로 재생을 시작한다.
playMusic();
handler.removeMessages(0);
handler.sendEmptyMessageDelayed(0,100);
}
@Override
public void onDestroy() {
if(mp != null){
//MediaPlayer 해제하기
mp.stop();
mp.release();
mp = null;
}
handler.removeMessages(0);
super.onDestroy();
}
Handler handler=new Handler(){
@Override
public void handleMessage(@NonNull Message msg) {
//음악을 control 할 수 있는 알림을 띄운다.
makeManualCancelNoti();
handler.sendEmptyMessageDelayed(0,100);
}
};
//수동으로 취소하는 알림을 띄우는 메소드
public void makeManualCancelNoti() {
//현재 재생 시간을 문자열로 얻어낸다.
int currentTime = mp.getCurrentPosition();
String info = String.format("%d min, %d sec",
TimeUnit.MILLISECONDS.toMinutes(currentTime),
TimeUnit.MILLISECONDS.toSeconds(currentTime)
- TimeUnit.MINUTES.toSeconds(TimeUnit.MILLISECONDS.toMinutes(currentTime)));
Intent iPlay = new Intent(this, MusicService.class);
iPlay.setAction(AppConstants.ACTION_PLAY);
PendingIntent pIntentPlay = PendingIntent.getService(this, 1, iPlay, PendingIntent.FLAG_MUTABLE);
Intent iPause = new Intent(this, MusicService.class);
iPlay.setAction(AppConstants.ACTION_PAUSE);
PendingIntent pIntentPause = PendingIntent.getService(this, 1, iPlay, PendingIntent.FLAG_MUTABLE);
Intent iStop = new Intent(this, MusicService.class);
iPlay.setAction(AppConstants.ACTION_STOP);
PendingIntent pIntentStop = PendingIntent.getService(this, 1, iPlay, PendingIntent.FLAG_MUTABLE);
//재생중인 음악의 제목
String songTitle=musicList.get(currentIndex).getTitle();
//띄울 알림을 구성하기
NotificationCompat.Builder builder = new NotificationCompat.Builder(this, AppConstants.CHANNEL_ID)
.setSmallIcon(android.R.drawable.star_on) //알림의 아이콘
.setContentTitle(songTitle) //알림의 제목
.setContentText(info)
.setPriority(NotificationCompat.PRIORITY_DEFAULT) //알림의 우선순위
.addAction(new NotificationCompat.Action(android.R.drawable.ic_media_play, "Play", pIntentPlay))
.addAction(new NotificationCompat.Action(android.R.drawable.ic_media_play, "Pause", pIntentPause))
.addAction(new NotificationCompat.Action(android.R.drawable.ic_media_play, "Stop", pIntentStop))
.setProgress(mp.getDuration(), mp.getCurrentPosition(), false)
//.setContentIntent(pendingIntent) //인텐트 전달자 객체
.setAutoCancel(false); //자동 취소 되는 알림인지 여부
//알림 만들기
Notification noti = builder.build();
//만일 알림 권한이 없다면
if (ActivityCompat.checkSelfPermission(this, android.Manifest.permission.POST_NOTIFICATIONS) != PackageManager.PERMISSION_GRANTED) {
//메소드를 여기서 종료
return;
}
//알림 매니저를 이용해서 알림을 띄운다.
NotificationManagerCompat.from(this).notify(AppConstants.NOTI_ID, noti);
}
}
- musicLIst 필드추가

- 이 목록을 MainActivity에서 넣어주고 이것을 서비스에 전달하기
- 아래의 currentIndex 에 곡번호를 넣고 번호만 전달해주면 알아서 로딩하도록 하기
- 서비스에서도 재생할 음악목록을 갖고 있게 한다.
public void setMusicList(List<MusicDto> musicList) {
    this.musicList = musicList;
}
- 안드로이드에서는 필드만 선언하면 자동으로 set,get 메소드를 만들어준다.
- setMusicList() 메소드로 musicList를 세팅할 수 있다.
- 받는 값은 int 값으로 바꾸어준다. 음악 목록 인덱스의 번호 값이다.
String url=AppConstants.MUSIC_URL+musicList.get(index).getSaveFileName();
- 인덱스를 알고있으니 DB에서 저장된 파일명(fileName)만 가져오면 개별 음악의 url을 생성할 수 있다.
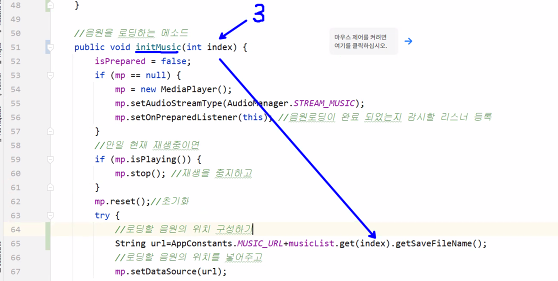
- 위에서 받아온 index 값이 이곳에 전달된다!
- MainActivity에서 음악목록을 받아와서 리스트를 만드는 과정에서
Service에 musicList를 세팅하는 작업이다!
MainActivity
package com.example.step23mp3player;
import android.app.NotificationChannel;
import android.app.NotificationManager;
import android.content.ComponentName;
import android.content.Context;
import android.content.Intent;
import android.content.ServiceConnection;
import android.content.SharedPreferences;
import android.content.pm.PackageManager;
import android.graphics.Bitmap;
import android.graphics.BitmapFactory;
import android.media.MediaMetadataRetriever;
import android.media.MediaPlayer;
import android.os.AsyncTask;
import android.os.Build;
import android.os.Bundle;
import android.os.Handler;
import android.os.IBinder;
import android.os.Message;
import android.preference.PreferenceManager;
import android.util.Log;
import android.view.View;
import android.widget.AdapterView;
import android.widget.ArrayAdapter;
import android.widget.ImageButton;
import android.widget.ImageView;
import android.widget.ListView;
import android.widget.ProgressBar;
import android.widget.SeekBar;
import android.widget.TextView;
import android.widget.Toast;
import androidx.annotation.NonNull;
import androidx.appcompat.app.AppCompatActivity;
import org.json.JSONArray;
import org.json.JSONException;
import org.json.JSONObject;
import java.io.BufferedReader;
import java.io.InputStreamReader;
import java.net.HttpURLConnection;
import java.net.URL;
import java.util.ArrayList;
import java.util.List;
import java.util.concurrent.TimeUnit;
public class MainActivity extends AppCompatActivity implements AdapterView.OnItemClickListener {
MediaPlayer mp;
//재생 준비가 되었는지 여부
boolean isPrepared=false;
ImageButton playBtn;
ProgressBar progress;
TextView time;
SeekBar seek;
//서비스의 참조값을 저장할 필드
MusicService service;
//서비스에 연결되었는지 여부
boolean isConnected;
//Adapter 에 연결된 모델 (단순 문자열)
List<String> songs;
//Adapter 의 참조값
ArrayAdapter<String> adapter;
SharedPreferences pref;
String sessionId;
String id;
//재생음악 목록(자세한 정보가 들어있는 목록)
List<MusicDto> musicList=new ArrayList<>();
//서비스 연결객체
ServiceConnection sConn=new ServiceConnection() {
//서비스에 연결이 되었을때 호출되는 메소드
@Override
public void onServiceConnected(ComponentName name, IBinder binder) {
//MusicService 객체의 참조값을 얻어와서 필드에 저장
//IBinder 객체를 원래 type 으로 casting
MusicService.LocalBinder lBinder=(MusicService.LocalBinder)binder;
service=lBinder.getService();
//연결되었다고 표시
isConnected=true;
//핸들러에 메세지 보내기
handler.removeMessages(0); //만일 핸들러가 동작중에 있으면 메세지를 제거하고
handler.sendEmptyMessageDelayed(0, 100); //다시 보내기
//재생 음악 목록을 서비스에도 전달을 해준다.
service.setMusicList(musicList);
}
//서비스에 연결이 해제 되었을때 호출되는 메소드
@Override
public void onServiceDisconnected(ComponentName name) {
//연결 해제 되었다고 표시
isConnected=false;
}
};
//UI 를 주기적으로 업데이트 하기 위한 Handler
Handler handler=new Handler(){
/*
이 Handler 에 메세지를 한번만 보내면 아래의 handleMessage() 메소드가
1/10 초 마다 반복적으로 호출된다.
handleMessage() 메소드는 UI 스레드 상에서 실행되기 때문에
마음대로 UI 를 업데이트 할수가 있다.
*/
@Override
public void handleMessage(@NonNull Message msg) {
if(service.isPrepared()){
//전체 재생시간
int maxTime=service.getMp().getDuration();
progress.setMax(maxTime);
seek.setMax(maxTime);
//현재 재생 위치
int currentTime=service.getMp().getCurrentPosition();
//음악 재생이 시작된 이후에 주기적으로 계속 실행이 되어야 한다.
progress.setProgress(currentTime);
seek.setProgress(currentTime);
//현재 재생 시간을 TextView 에 출력하기
String info=String.format("%d min, %d sec",
TimeUnit.MILLISECONDS.toMinutes(currentTime),
TimeUnit.MILLISECONDS.toSeconds(currentTime)
-TimeUnit.MINUTES.toSeconds(TimeUnit.MILLISECONDS. toMinutes(currentTime)) );
time.setText(info);
}
//자신의 객체에 다시 빈 메세제를 보내서 handleMessage() 가 일정시간 이후에 호출 되도록 한다.
handler.sendEmptyMessageDelayed(0, 100); // 1/10 초 이후에
}
};
@Override
protected void onCreate(Bundle savedInstanceState) {
super.onCreate(savedInstanceState);
setContentView(R.layout.activity_main);
//TextView 의 참조값 얻어와서 필드에 저장
time=findViewById(R.id.time);
// %d 는 숫자, %s 문자
String info=String.format("%d min, %d sec", 0, 0);
time.setText(info);
//ProgressBar 의 참조값 얻어오기
progress=findViewById(R.id.progress);
seek=findViewById(R.id.seek);
//재생 버튼
playBtn=findViewById(R.id.playBtn);
//재생버튼을 눌렀을때
playBtn.setOnClickListener(v->{
//서비스의 playMusic() 메소드를 호출해서 음악이 재생 되도록 한다.
service.playMusic();
});
//일시 중지 버튼
ImageButton pauseBtn=findViewById(R.id.pauseBtn);
pauseBtn.setOnClickListener(v->{
service.pauseMusic();
});
//알림체널만들기
createNotificationChannel();
//ListView 관련 작업
ListView listView=findViewById(R.id.listView);
//셈플 데이터
songs=new ArrayList<>();
//ListView 에 연결할 아답타
adapter=new ArrayAdapter<>(this, android.R.layout.simple_list_item_activated_1, songs);
listView.setAdapter(adapter);
//ListView 에 아이템 클릭 리스너 등록
listView.setOnItemClickListener(this);
}
@Override
protected void onStart() {
super.onStart();
// MusicService 에 연결할 인텐트 객체
Intent intent=new Intent(this, MusicService.class);
intent.setAction("Dummy Action");
//서비스 시작 시키기
//이미 서비스가 동작 중이라면 onStartCommand() 메소드만 다시 호출한다.
startService(intent);
pref= PreferenceManager.getDefaultSharedPreferences(this);
sessionId=pref.getString("sessionId", "");
//로그인 했는지 체크하기
new LoginCheckTask().execute(AppConstants.BASE_URL+"/music/logincheck");
}
@Override
protected void onStop() {
super.onStop();
if(isConnected){
//서비스 바인딩 해제
unbindService(sConn);
isConnected=false;
}
}
//앱의 사용자가 알림을 직접 관리 할수 있도록 알림 체널을 만들어야한다.
public void createNotificationChannel(){
//알림 체널을 지원하는 기기인지 확인해서
if (Build.VERSION.SDK_INT >= Build.VERSION_CODES.O) {
//알림 체널을 만들기
//셈플 데이터
String name="Music Player";
String text="Control";
//알림체널 객체를 얻어내서
//알림을 1/10 초마다 새로 보낼 예정이기 때문에 진동은 울리지 않도록 IMPORTANCE_LOW 로 설정한다
NotificationChannel channel=
new NotificationChannel(AppConstants.CHANNEL_ID, name, NotificationManager.IMPORTANCE_LOW);
//체널의 설명을 적고
channel.setDescription(text);
//알림 메니저 객체를 얻어내서
NotificationManager notiManager=(NotificationManager)getSystemService(Context.NOTIFICATION_SERVICE);
//알림 체널을 만든다.
notiManager.createNotificationChannel(channel);
}
}
@Override
public void onRequestPermissionsResult(int requestCode, @NonNull String[] permissions, @NonNull int[] grantResults) {
super.onRequestPermissionsResult(requestCode, permissions, grantResults);
switch (requestCode){
case 0:
//권한을 부여 했다면
if(grantResults[0] == PackageManager.PERMISSION_GRANTED){
}else{//권한을 부여 하지 않았다면
Toast.makeText(this, "알림을 띄울 권한이 필요합니다.",
Toast.LENGTH_SHORT).show();
}
break;
}
}
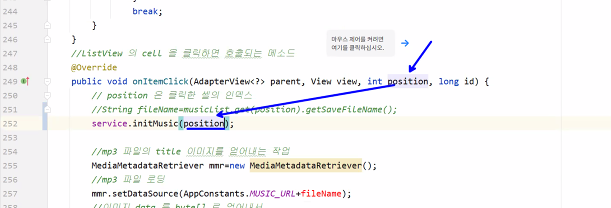
//ListView 의 cell 을 클릭하면 호출되는 메소드
@Override
public void onItemClick(AdapterView<?> parent, View view, int position, long id) {
// position 은 클릭한 셀의 인덱스를 서비스에 연결해서 해당 음악을 재생하도록 한다.
service.initMusic(position);
//mp3 파일의 title 이미지를 얻어내는 작업
MediaMetadataRetriever mmr=new MediaMetadataRetriever();
//재생할 음악의 저장된 파일명
String fileName=musicList.get(position).getSaveFileName();
//mp3파일 로딩
mmr.setDataSource(AppConstants.MUSIC_URL+fileName);
//image data를 byte[] 로 얻어내서
byte[] imageData=mmr.getEmbeddedPicture();
//만일 이미지 데이터가 있다면
if(imageData != null) {
//byte[] 를 활용해서 Bitmap 이미지를 얻어내고
Bitmap image = BitmapFactory.decodeByteArray(imageData, 0, imageData.length);
//Bitmap 이미지를 출력할 ImageView
ImageView imageView = findViewById(R.id.imageView);
imageView.setImageBitmap(image);
}else{
//기본 이미지를 출력한다
}
}
//로그인 여부를 체크하는 작업을 할 비동기 task
class LoginCheckTask extends AsyncTask<String, Void, Boolean> {
@Override
protected Boolean doInBackground(String... strings) {
//로그인 체크 url
String requestUrl=strings[0];
//서버가 http 요청에 대해서 응답하는 문자열을 누적할 객체
StringBuilder builder=new StringBuilder();
HttpURLConnection conn=null;
InputStreamReader isr=null;
BufferedReader br=null;
boolean isLogin=false;
try{
//URL 객체 생성
URL url=new URL(requestUrl);
//HttpURLConnection 객체의 참조값 얻어오기
conn=(HttpURLConnection)url.openConnection();
if(conn!=null){//연결이 되었다면
conn.setConnectTimeout(20000); //응답을 기다리는 최대 대기 시간
conn.setRequestMethod("GET");//Default 설정
conn.setUseCaches(false);//케쉬 사용 여부
//App 에 저장된 session id 가 있다면 요청할때 쿠키로 같이 보내기
if(!sessionId.equals("")) {
// JSESSIONID=xxx 형식의 문자열을 쿠키로 보내기
conn.setRequestProperty("Cookie", sessionId);
}
//응답 코드를 읽어온다.
int responseCode=conn.getResponseCode();
if(responseCode==200){//정상 응답이라면...
//서버가 출력하는 문자열을 읽어오기 위한 객체
isr=new InputStreamReader(conn.getInputStream());
br=new BufferedReader(isr);
//반복문 돌면서 읽어오기
while(true){
//한줄씩 읽어들인다.
String line=br.readLine();
//더이상 읽어올 문자열이 없으면 반복문 탈출
if(line==null)break;
//읽어온 문자열 누적 시키기
builder.append(line);
}
}
}
//서버가 응답한 쿠키 목록을 읽어온다.
List<String> cookList=conn.getHeaderFields().get("Set-Cookie");
//만일 쿠키가 존재 한다면
if(cookList != null){
//반복문 돌면서
for(String tmp : cookList){
//session id 가 들어 있는 쿠키를 찾아내서
if(tmp.contains("JSESSIONID")){
//session id 만 추출해서
String sessionId=tmp.split(";")[0];
//SharedPreferences 을 편집할수 있는 객체를 활용해서
SharedPreferences.Editor editor=pref.edit();
//sessionId 라는 키값으로 session id 값을 저장한다.
editor.putString("sessionId", sessionId);
editor.apply();//apply() 는 비동기로 저장하기 때문에 실행의 흐름이 잡혀 있지 않다(지연이 없음)
//필드에도 담아둔다.
MainActivity.this.sessionId=sessionId;
}
}
}
//출력받은 문자열 전체 얻어내기
JSONObject obj=new JSONObject(builder.toString());
/*
{"isLogin":false} or {"isLogin":true, "id":"kimgura"}
서버에서 위와 같은 형식의 json 문자열을 응답할 예정이다.
*/
Log.d("서버가 응답한 문자열", builder.toString());
//로그인 여부를 읽어와서
isLogin=obj.getBoolean("isLogin");
//만일 로그인을 했다면
if(isLogin){
//필드에 로그인된 아이디를 담아둔다.
id=obj.getString("id");
}
}catch(Exception e){//예외가 발생하면
Log.e("LoginCheckTask", e.getMessage());
}finally {
try{
if(isr!=null)isr.close();
if(br!=null)br.close();
if(conn!=null)conn.disconnect();
}catch(Exception e){}
}
//로그인 여부를 리턴하면 아래의 onPostExecute() 메소드에 전달된다.
return isLogin;
}
@Override
protected void onPostExecute(Boolean isLogin) {
super.onPostExecute(isLogin);
//여기는 UI 스레드 이기 때문에 UI 와 관련된 작업을 할수 있다.
//TextView 에 로그인 여부를 출력하기
if(isLogin){
TextView infoText=findViewById(R.id.infoText);
infoText.setText(id+" 님 로그인중...");
//재생목록 받아오기
new MusicListTask().execute(AppConstants.BASE_URL+"/api/music/list");
//액티비티의 bindService() 메소드를 이용해서 연결한다.
Intent intent=new Intent(MainActivity.this, MusicService.class);
intent.setAction("Dummy Action");
bindService(intent, sConn, Context.BIND_AUTO_CREATE);
}else{
//로그인 액티비티로 이동
Intent intent=new Intent(MainActivity.this, LoginActivity.class);
startActivity(intent);
}
}
}
//재생목록을 얻어올 작업을 할 비동기 task
class MusicListTask extends AsyncTask<String, Void, String> {
@Override
protected String doInBackground(String... strings) {
//요청 url
String requestUrl=strings[0];
//서버가 http 요청에 대해서 응답하는 문자열을 누적할 객체
StringBuilder builder=new StringBuilder();
HttpURLConnection conn=null;
InputStreamReader isr=null;
BufferedReader br=null;
try{
//URL 객체 생성
URL url=new URL(requestUrl);
//HttpURLConnection 객체의 참조값 얻어오기
conn=(HttpURLConnection)url.openConnection();
if(conn!=null){//연결이 되었다면
conn.setConnectTimeout(20000); //응답을 기다리는 최대 대기 시간
conn.setRequestMethod("GET");//Default 설정
conn.setUseCaches(false);//케쉬 사용 여부
//App 에 저장된 session id 가 있다면 요청할때 쿠키로 같이 보내기
if(!sessionId.equals("")) {
// JSESSIONID=xxx 형식의 문자열을 쿠키로 보내기
conn.setRequestProperty("Cookie", sessionId);
}
//응답 코드를 읽어온다.
int responseCode=conn.getResponseCode();
if(responseCode==200){//정상 응답이라면...
//서버가 출력하는 문자열을 읽어오기 위한 객체
isr=new InputStreamReader(conn.getInputStream());
br=new BufferedReader(isr);
//반복문 돌면서 읽어오기
while(true){
//한줄씩 읽어들인다.
String line=br.readLine();
//더이상 읽어올 문자열이 없으면 반복문 탈출
if(line==null)break;
//읽어온 문자열 누적 시키기
builder.append(line);
}
}
}
//서버가 응답한 쿠키 목록을 읽어온다.
List<String> cookList=conn.getHeaderFields().get("Set-Cookie");
//만일 쿠키가 존대 한다면
if(cookList != null){
//반복문 돌면서
for(String tmp : cookList){
//session id 가 들어 있는 쿠키를 찾아내서
if(tmp.contains("JSESSIONID")){
//session id 만 추출해서
String sessionId=tmp.split(";")[0];
//SharedPreferences 을 편집할수 있는 객체를 활용해서
SharedPreferences.Editor editor=pref.edit();
//sessionId 라는 키값으로 session id 값을 저장한다.
editor.putString("sessionId", sessionId);
editor.apply();//apply() 는 비동기로 저장하기 때문에 실행의 흐름이 잡혀 있지 않다(지연이 없음)
//필드에도 담아둔다.
MainActivity.this.sessionId=sessionId;
}
}
}
}catch(Exception e){//예외가 발생하면
Log.e("MusicListTask", e.getMessage());
}finally {
try{
if(isr!=null)isr.close();
if(br!=null)br.close();
if(conn!=null)conn.disconnect();
}catch(Exception e){}
}
//응답받은 문자열을 리턴한다.
return builder.toString();
}
@Override
protected void onPostExecute(String jsonStr) {
super.onPostExecute(jsonStr);
//여기는 UI 스레드 (자유롭게 UI작업을 할수있다)
//jsonStr 은 [{},{},...] 형식의 문자열이기 때문에 JSONArray 객체를 생성한다.
songs.clear();
musicList.clear();
try {
JSONArray arr=new JSONArray(jsonStr);
for(int i=0; i<arr.length(); i++){
//i번째 JSONObject 객체를 참조
JSONObject tmp=arr.getJSONObject(i);
int num=tmp.getInt("num");
String writer=tmp.getString("writer");
//"title" 이라는 키값으로 저장된 문자열 읽어오기
String title=tmp.getString("title");
String artist=tmp.getString("artist");
String orgFileName=tmp.getString("orgFileName");
String saveFileName=tmp.getString("saveFileName");
String regdate=tmp.getString("regdate");
//ListView에 연결된 모델에 곡의 제목을 담는다.
songs.add(title);
//음악 하나의 자세한 정보를 MusicDto에 담고
MusicDto dto=new MusicDto();
dto.setNum(num);
dto.setWriter(writer);
dto.setTitle(title);
dto.setArtist(artist);
dto.setOrgFileName(orgFileName);
dto.setSaveFileName(saveFileName);
dto.setRegdate(regdate);
//MusicDto를 list에 누적시킨다.
musicList.add(dto);
}
//모델의 데이터가 바뀌었다고 아답타에 알려서 listView가 업데이트 되도록 한다.
adapter.notifyDataSetChanged();
} catch (JSONException je) {
Log.e("onPostExecute()", je.getMessage());
}
}
}
}
- initMusic에서 에러나는 부분이 있는데, 인자로 position 을 전달해주면 된다.(음악목록의 인덱스 값)
- 이렇게 하고 실행해보면 오류가 발생하는데, 서비스가 바인딩 되는 데에 시간이 걸려서 아직 바인딩되지 않았을 때 musicList를 세팅하게 되어서이다.
- Service 에 MusicList 를 세팅하는 시점을 조정해주어야 한다.
- MainActivity에서 musicList 를 얻어오는데 시간이 좀 소요될 수 있으므로,
바인딩이 확실히 되었을 때 musicList를 넣어주어야 한다.
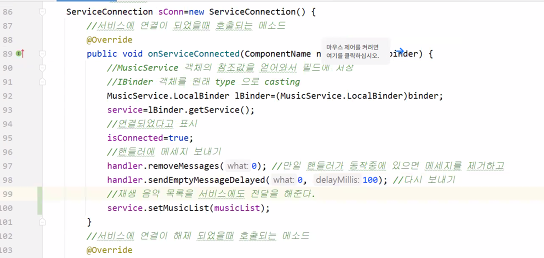
- onServiceConnected() 메소드 안쪽으로, 바인딩이 되었을 때로 이동시킨다.
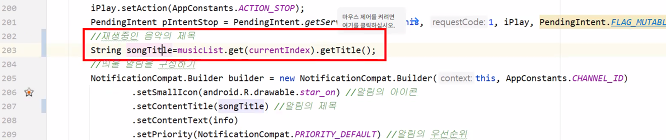
- currentIndex를 활용해서 제목도 곡마다 다르게 얻어내서 알림창에 넣어줄 수 있다.
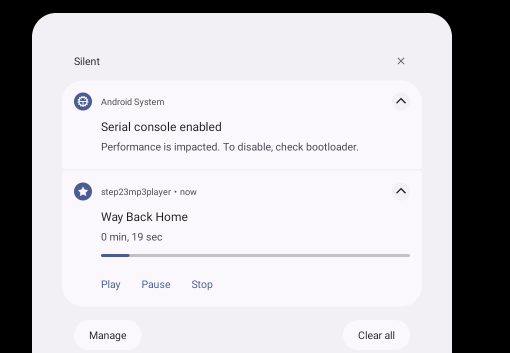
- 알림창에 변경된 제목이 잘 출력된다.
- 만약 서버를 사용하지 않는 경우 음악을 파일시스템에 넣어두고 ContentProvider를 통해 음악목록을 얻어올수도 있다.
'국비교육(22-23)' 카테고리의 다른 글
| 97일차(1)/Android App(61) : mp3 파일 재생 예제 / 되감기, 빨리감기 기능 구현 (0) | 2023.02.24 |
|---|---|
| 96일차(1)/Android App(60) : mp3 파일 재생 예제 / 곡 연속 재생 설정 (0) | 2023.02.24 |
| 94일차(1)/Android App(58) : mp3 파일 재생 예제 / Metadata 추출 (0) | 2023.02.21 |
| 93일차(2)/Android App(57) : mp3 파일 재생 예제 / 로그인 기능 구현 (0) | 2023.02.21 |
| 93일차(1)/Spring Boot(16) : Custom Exception 활용 예제 (0) | 2023.02.20 |