77일차(4)/Android App(40) : Http POST방식 요청하기(3)
step17httprequest3
- http 요청 코틀린으로 작성해보기

- 안드로이드 스튜디오의 기능 중 java->kotlin 변환기능이 있다.
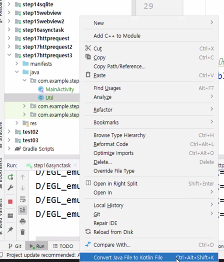
- Util을 가져와서 우클릭- convert to Kotlin 을 해본다!
- 오류나는건 일부 수정하기..
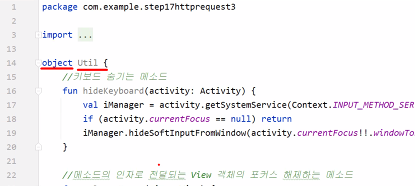
Util.kt
package com.example.step17httprequest3
import android.app.Activity
import android.content.Context
import android.os.AsyncTask
import android.view.View
import android.view.ViewGroup
import android.view.inputmethod.InputMethodManager
import java.io.*
import java.net.HttpURLConnection
import java.net.URL
import java.net.URLEncoder
object Util {
//키보드 숨기는 메소드
fun hideKeyboard(activity: Activity) {
val iManager = activity.getSystemService(Context.INPUT_METHOD_SERVICE) as InputMethodManager
if (activity.currentFocus == null) return
iManager.hideSoftInputFromWindow(activity.currentFocus!!.windowToken, 0)
}
//메소드의 인자로 전달되는 View 객체의 포커스 해제하는 메소드
fun releaseFocus(view: View) {
var parent = view.parent
var group: ViewGroup? = null
var child: View? = null
while (parent != null) {
if (parent is ViewGroup) {
group = parent
for (i in 0 until group!!.childCount) {
child = group.getChildAt(i)
if (child !== view && child.isFocusable) child.requestFocus()
}
}
parent = parent.parent
}
}
/*
1. 사용할때 RequestListener 인터페이스 Type 을 전달한다.
2. 결과는 RequestListener 객체에 전달된다.
3. Map<String,Object> 에서 응답 코드는
"code" 라는 키값으로 200, 404, 500, -1 중에 하나가 리턴되고
-1 이 리턴되면 Exception 발생으로 실패이다. onFail() 호출
*/
fun sendGetRequest(requestId: Int,
requestUrl: String?,
params: Map<String?, String?>?,
listener: RequestListener?) {
val task = RequestTask()
task.setRequestId(requestId)
task.setRequestUrl(requestUrl)
task.setListener(listener)
task.execute(params)
}
//POST 방식 REQUEST
fun sendPostRequest(requestId: Int, requestUrl: String?, params: Map<String?, String?>?, listener: RequestListener?) {
val task = PostRequestTask()
task.setRequestId(requestId)
task.setRequestUrl(requestUrl)
task.setListener(listener)
task.execute(params)
}
interface RequestListener {
fun onSuccess(requestId: Int, result: Map<String, Any?>?)
fun onFail(requestId: Int, result: Map<String, Any?>?)
}
private class RequestTask : AsyncTask<Map<String?, String?>, Void?, Map<String, Any?>>() {
private var requestId = 0
private var requestUrl: String? = null
private var listener: RequestListener? = null
fun setListener(listener: RequestListener?) {
this.listener = listener
}
fun setRequestId(requestId: Int) {
this.requestId = requestId
}
fun setRequestUrl(requestUrl: String?) {
this.requestUrl = requestUrl
}
protected override fun doInBackground(vararg params: Map<String?, String?>?): Map<String, Any?>? {
var requestUrl = requestUrl
val param = params[0]
if (param != null) { //요청 파리미터가 존재 한다면
//서버에 전송할 데이터를 문자열로 구성하기
val buffer = StringBuffer()
val keySet = param.keys
val it = keySet.iterator()
var isFirst = true
//반복문 돌면서 map 에 담긴 모든 요소를 전송할수 있도록 구성한다.
while (it.hasNext()) {
val key = it.next()
var arg: String? = null
//파라미터가 한글일 경우 깨지지 않도록 하기 위해.
var encodedValue: String? = null
try {
encodedValue = URLEncoder.encode(param[key], "utf-8")
} catch (e: UnsupportedEncodingException) {
}
if (isFirst) {
arg = "?$key=$encodedValue"
isFirst = false
} else {
arg = "&$key=$encodedValue"
}
buffer.append(arg)
}
val data = buffer.toString()
requestUrl += data
}
//서버가 http 요청에 대해서 응답하는 문자열을 누적할 객체
val builder = StringBuilder()
var conn: HttpURLConnection? = null
var isr: InputStreamReader? = null
var br: BufferedReader? = null
//결과값을 담을 Map Type 객체
val map: MutableMap<String, Any?> = HashMap()
try {
//URL 객체 생성
val url = URL(requestUrl)
//HttpURLConnection 객체의 참조값 얻어오기
conn = url.openConnection() as HttpURLConnection
if (conn != null) { //연결이 되었다면
conn.connectTimeout = 20000 //응답을 기다리는 최대 대기 시간
conn.requestMethod = "GET" //Default 설정
conn.useCaches = false //케쉬 사용 여부
//응답 코드를 읽어온다.
val responseCode = conn.responseCode
//Map 객체에 응답 코드를 담는다.
map["code"] = responseCode
if (responseCode == 200) { //정상 응답이라면...
//서버가 출력하는 문자열을 읽어오기 위한 객체
isr = InputStreamReader(conn.inputStream)
br = BufferedReader(isr)
//반복문 돌면서 읽어오기
while (true) {
//한줄씩 읽어들인다.
val line = br.readLine() ?: break
//더이상 읽어올 문자열이 없으면 반복문 탈출
//읽어온 문자열 누적 시키기
builder.append(line)
}
//출력받은 문자열 전체 얻어내기
val str = builder.toString()
//아래 코드는 수행 불가
//console.setText(str);
//Map 객체에 결과 문자열을 담는다.
map["data"] = str
}
}
} catch (e: Exception) { //예외가 발생하면
//에러 정보를 담는다.
map["code"] = -1
map["data"] = e.message
} finally {
try {
isr?.close()
br?.close()
conn?.disconnect()
} catch (e: Exception) {
}
}
//결과를 담고 있는 Map 객체를 리턴해준다.
return map
}
override fun onPostExecute(map: Map<String, Any?>) {
super.onPostExecute(map)
val code = map["code"] as Int
if (code != -1) { //성공이라면
listener!!.onSuccess(requestId, map)
} else { //실패 (예외발생)
listener!!.onFail(requestId, map)
}
}
}
class PostRequestTask : AsyncTask<Map<String?, String?>, Void?, Map<String, Any?>>() {
private var requestId = 0
private var requestUrl: String? = null
private var listener: RequestListener? = null
fun setListener(listener: RequestListener?) {
this.listener = listener
}
fun setRequestId(requestId: Int) {
this.requestId = requestId
}
fun setRequestUrl(requestUrl: String?) {
this.requestUrl = requestUrl
}
protected override fun doInBackground(vararg params: Map<String?, String?>?): Map<String, Any?>? {
val param = params[0]
var queryString = ""
if (param != null) { //요청 파리미터가 존재 한다면
//서버에 전송할 데이터를 문자열로 구성하기
val buffer = StringBuffer()
val keySet = param.keys
val it = keySet.iterator()
var isFirst = true
//반복문 돌면서 map 에 담긴 모든 요소를 전송할수 있도록 구성한다.
while (it.hasNext()) {
val key = it.next()
var arg: String? = null
if (isFirst) {
arg = key + "=" + param[key]
isFirst = false
} else {
arg = "&" + key + "=" + param[key]
}
buffer.append(arg)
}
queryString = buffer.toString()
}
//서버가 http 요청에 대해서 응답하는 문자열을 누적할 객체
val builder = StringBuilder()
var conn: HttpURLConnection? = null
var isr: InputStreamReader? = null
var br: BufferedReader? = null
var pw: PrintWriter? = null
//결과값을 담을 Map Type 객체
val map: MutableMap<String, Any?> = HashMap()
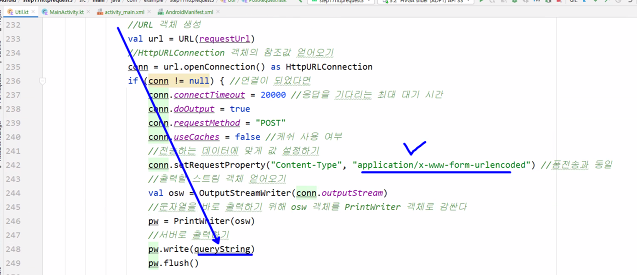
try {
//URL 객체 생성
val url = URL(requestUrl)
//HttpURLConnection 객체의 참조값 얻어오기
conn = url.openConnection() as HttpURLConnection
if (conn != null) { //연결이 되었다면
conn.connectTimeout = 20000 //응답을 기다리는 최대 대기 시간
conn.doOutput = true
conn.requestMethod = "POST"
conn.useCaches = false //케쉬 사용 여부
//전송하는 데이터에 맞게 값 설정하기
conn.setRequestProperty("Content-Type", "application/x-www-form-urlencoded") //폼전송과 동일
//출력할 스트림 객체 얻어오기
val osw = OutputStreamWriter(conn.outputStream)
//문자열을 바로 출력하기 위해 osw 객체를 PrintWriter 객체로 감싼다
pw = PrintWriter(osw)
//서버로 출력하기
pw.write(queryString)
pw.flush()
//응답 코드를 읽어온다.
val responseCode = conn.responseCode
//Map 객체에 응답 코드를 담는다.
map["code"] = responseCode
if (responseCode == 200) { //정상 응답이라면...
//서버가 출력하는 문자열을 읽어오기 위한 객체
isr = InputStreamReader(conn.inputStream)
br = BufferedReader(isr)
//반복문 돌면서 읽어오기
while (true) {
//한줄씩 읽어들인다.
val line = br.readLine() ?: break
//더이상 읽어올 문자열이 없으면 반복문 탈출
//읽어온 문자열 누적 시키기
builder.append(line)
}
//출력받은 문자열 전체 얻어내기
val str = builder.toString()
//아래 코드는 수행 불가
//console.setText(str);
//Map 객체에 결과 문자열을 담는다.
map["data"] = str
}
}
} catch (e: Exception) { //예외가 발생하면
//에러 정보를 담는다.
map["code"] = -1
map["data"] = e.message
} finally {
try {
pw?.close()
isr?.close()
br?.close()
conn?.disconnect()
} catch (e: Exception) {
}
}
//결과를 담고 있는 Map 객체를 리턴해준다.
return map
}
override fun onPostExecute(map: Map<String, Any?>) {
super.onPostExecute(map)
val code = map["code"] as Int
if (code != -1) { //성공이라면
listener!!.onSuccess(requestId, map)
} else { //실패 (예외발생)
listener!!.onFail(requestId, map)
}
}
}
}
- 바로 점을 찍어서 사용할 수 있도록 object 형태로 만들어놓았다.

- Util.requestListener를 구현
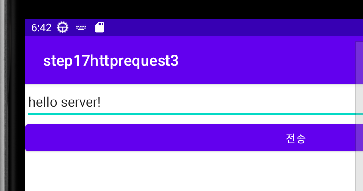
- 입력하고 전송버튼을누르면 post 방식으로 전송하고,
전송 결과를 json 문자열로 받아오는 연습!
activity_main.xml
<?xml version="1.0" encoding="utf-8"?>
<LinearLayout xmlns:android="http://schemas.android.com/apk/res/android"
    xmlns:app="http://schemas.android.com/apk/res-auto"
    xmlns:tools="http://schemas.android.com/tools"
    android:layout_width="match_parent"
    android:layout_height="match_parent"
    tools:context=".MainActivity"
    android:orientation="vertical">

    <EditText
        android:layout_width="match_parent"
        android:layout_height="wrap_content"
        android:id="@+id/inputMsg"
        android:hint="서버에 할말 입력" />
    <Button
        android:layout_width="match_parent"
        android:layout_height="wrap_content"
        android:id="@+id/sendBtn"
        android:text="전송"/>

</LinearLayout>
- AndroidManifest 설정 (인터넷 허용)

MainActivity.kt
package com.example.step17httprequest3
import android.os.Bundle
import android.util.Log
import android.widget.Button
import android.widget.EditText
import androidx.appcompat.app.AppCompatActivity
import org.json.JSONObject
class MainActivity : AppCompatActivity() , Util.RequestListener {
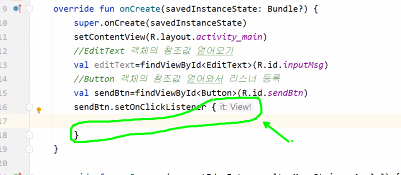
override fun onCreate(savedInstanceState: Bundle?) {
super.onCreate(savedInstanceState)
setContentView(R.layout.activity_main)
//EditText 객체의 참조값 얻어오기
val editText=findViewById<EditText>(R.id.inputMsg)
//Button 객체의 참조값 얻어와서 리스너 등록
val sendBtn=findViewById<Button>(R.id.sendBtn)
sendBtn.setOnClickListener {
//EditText에 입력한 문자열을 읽어와서
val msg=editText.text.toString()
Util.sendPostRequest(
999,
"http://192.168.0.34:9000/boot07/api/send",
mapOf("msg" to msg), //"msg" 라는 키값으로 입력한 메세지를 담은 Map
this)
}
}
override fun onSuccess(requestId: Int, result: Map<String, Any?>?) {
if(requestId == 999){
//웹서버가 응답한 json문자열 { }
val jsonStr = result?.get("data").toString()
Log.d("#### json 문자열 ####", jsonStr)
val obj=JSONObject(jsonStr)
//key 값을 이용해서 Boolean, String, Int 값을 추출할 수 있다.
val isSuccess=obj.getBoolean("isSuccess")
val response=obj.getString("response")
val num=obj.getInt("num")
}
}
override fun onFail(requestId: Int, result: Map<String, Any?>?) {
}
}

- 변수를 만들 때 어떤 타입을 받을지 제너릭<> 타입 명시!
- 이것은 코틀린에서 function 타입이다.

var a = { }
var a:()->Unit = { }
- var a = { } 라고 하면 a의 타입은?
- val a:()->Unit = fun(){} 원래는 이거인데, 생략해서 쓰면 val a:()->Unit = {} 로 작성할 수 있다.
- 이것은 인자로 아무것도 전달받지 않고, 아무 값도 리턴해주지 않는 함수라는 의미이다.
- 괄호 없이 바로 함수를 넣어주는 것이나 마찬가지다.
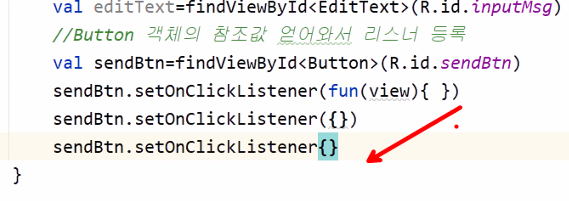
sendBtn.setOnClickListener(fun(view){})
sendBtn.setOnClickListener({})
sendBtn.setOnClickListener {}
- 위의 3줄 코드는 모두 같은 것이다. 요약하여 작성한 것

- sendPostRequest 메소드 사용
- 필요한 인자를 잘 보고 값을 넣어주기!

- Map에 msg라는 키값으로 메시지를 담아준다.
- java code로 작성하면 위와 같다.
- map, 유틸리티 사용하기
- map 에 담긴 것을 알아내서 쿼리문으로 만들어서 post 방식으로 전송하고 있다.
- msg=xx 등 queryString 변수에 들어가 있는 문자를 post 방식으로 전송한다.
→ 이 요청을 처리할 Spring Boot의 컨트롤러가 필요하다.
- 웹서버를 연동하지 않는 안드로이드 앱은 거의 없다.
- 로그인, 입력한 id,pw를 서버에 보내서 검증할 때 등등... 서버 연동을 쓸 일이 많다.
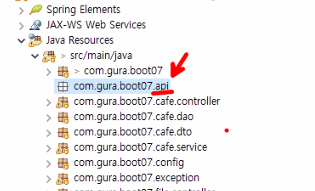
- Spring Boot에서 새 패키지, 컨트롤러 생성
AndroidController
package com.sy.boot07.api;

import java.util.HashMap;
import java.util.Map;

import org.springframework.stereotype.Controller;
import org.springframework.web.bind.annotation.RequestMapping;
import org.springframework.web.bind.annotation.ResponseBody;

@Controller
public class AndroidController {
	/*
	 * JSON 문자열
	 * 1. @ResponseBody 어노테이션
     * 2. Map 혹은 List 혹은 Dto 를 리턴하면 자동으로 JSON 문자열로 변환 되어서 응답된다.
	 */
	@RequestMapping("/api/send")
	@ResponseBody
	public Map<String, Object> send(String msg){
		System.out.println(msg);
		Map<String, Object> map=new HashMap<>();
		map.put("isSuccess", true);
		map.put("response", "hello client!");
		map.put("num", 1);
		return map;
	}
}

- 안드로이드에서 /api/send 를 요청하면 json으로 응답하도록
- http://192.168.0.34:9000/boot07/api/send 이런 주소가 된다.

http://192.168.0.34:9000/boot07/api/send?msg=hello
- 브라우저 주소 창에 이렇게 입력해주면, 위와 같이 json으로 응답한다.
- 이것을 이제 안드로이드로 해볼 것이다!
- map에 담긴 내용이 json 문자열로 자동으로 변환된다.
- @responsebody 를 작성해주면, map에 담긴 내용이 json으로 바뀌어서 응답된다.
- 안드로이드에서 이 json 문자열을 활용하는 방식을 익힌다.
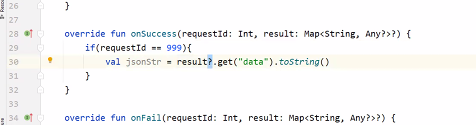
- 받아오는 json문자열이 null일 가능성이 있으므로(Any? 타입) result에도 ?를 붙여준다.

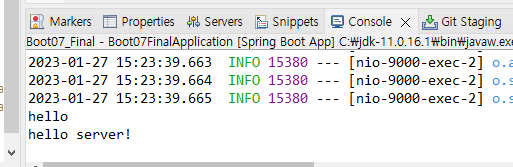
- json 문자열이 안드로이드의 콘솔창, STS의 콘솔창으로 잘 들어왔다.
- 안드로이드 java / kotlin 환경에서 이 json문자열을 어떻게 다뤄야 하는가?
- 안드로이드 패키지에 JsonObject 라는 클래스가 있다.
- JsonObject 객체를 생성하면서 이 json 문자열을 넣는다.

- 읽어올 값의 타입에 맞는 메소드로 내용을 읽어올 수 있다.

- 이렇게 json 문자열을 읽어와서 활용할 수 있다.
- 안드로이드 네이티브 UI에 이 값들을 넣어서 동작하게 만들면 된다.
- json값은 쉽게 읽어올 수 있다. 어떻게 사용할지만 집중하면 된다.
- 웹서버와 안드로이드가 대화하는 방식을 이해하기!
- http요청 → json으로 받기 → json에 있는 데이터 추출해서 활용하기
'국비교육(22-23)' 카테고리의 다른 글
| 79일차(1)/Android App(42) : Http 요청으로 Oracle DB 출력하기 (0) | 2023.02.02 |
|---|---|
| 78일차(1)/Android App(41) : Http POST방식 요청하기(4) - JSONArray 활용 (1) | 2023.01.30 |
| 77일차(3)/Android App(39) : Http POST방식 요청하기(2) (0) | 2023.01.30 |
| 77일차(2)/Android App(38) : Http POST방식 요청하기(1) (0) | 2023.01.27 |
| 77일차(1)/Android App(37) : AsyncTask(2) (0) | 2023.01.27 |