77일차(1)/Android App(37) : AsyncTask(2)
MainActivity
package com.example.step16asynctask;
import android.os.AsyncTask;
import android.os.Bundle;
import android.os.Handler;
import android.os.Message;
import android.widget.Button;
import android.widget.EditText;
import android.widget.TextView;
import androidx.annotation.NonNull;
import androidx.appcompat.app.AlertDialog;
import androidx.appcompat.app.AppCompatActivity;
/*
UI에 관련된 작업이 가능한 스레드는 오직 MainThread(UI Thread)에서만 가능하다.
(아무데서나 UI를 조작할 수 없다.)
*/
public class MainActivity extends AppCompatActivity {
EditText editText;
TextView textView;
@Override
protected void onCreate(Bundle savedInstanceState) {
super.onCreate(savedInstanceState);
setContentView(R.layout.activity_main);
//전송버튼
Button sendBtn=findViewById(R.id.sendBtn);
sendBtn.setOnClickListener(v -> {
/*
시간이 오래 걸리거나 혹은 실행 시간이 불확실한 작업은
Main thread(UI thread) 에서 하면 안 된다.
*/
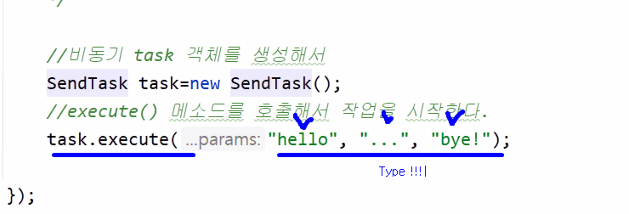
//비동기 task 객체를 생성해서
SendTask task=new SendTask();
//execute() 메소드를 호출해서 작업을 시작한다.
task.execute("hello", "...", "bye!");
});
//EditText의 참조값을 필드에 저장
editText=findViewById(R.id.editText);
Button testBtn=findViewById(R.id.testBtn);
testBtn.setOnClickListener(v -> {
//새로운 스레드에서 어떤 작업을 하고 작업이 끝나면 그 스레드 안에서 EditText에 문자열을 출력하려고 한다. 가능할까?
new Thread(new Runnable() {
@Override
public void run() {
//3초가 소요되는 어떤 작업이라고 가정
try {
Thread.sleep(3000);
} catch (InterruptedException e) {
throw new RuntimeException(e);
}
//EditText에 문자열을 출력해보자
//editText.setText("작업이 종료되었습니다."); //ui 스레드에서 ui를 업데이트할 수 없으니
//handler 객체에 메시지를 보내서 ui를 업데이트하도록 한다.
handler.sendEmptyMessage(0);
}
}).start();
});
//TextView의 참조값을 필드에 저장하기
textView=findViewById(R.id.textView);
Button startBtn=findViewById(R.id.startBtn);
startBtn.setOnClickListener(v -> {
//비동기 Task 시작하기
new CountTask().execute("바나나","딸기","복숭아");
});
}
class CountTask extends AsyncTask<String, Integer, String>{
@Override
protected String doInBackground(String... strings) {
//strings는 String[] 이다. 전달된 파라미터는 배열에 순서대로 저장되어 있다.
String p1=strings[0]; //바나나
String p2=strings[1]; //딸기
String p3=strings[2]; //복숭아
int count=0;
//반복문을 10번 돌면서 카운트를 센다.
for(int i=0; i<10; i++){
try {
Thread.sleep(1000);
} catch (InterruptedException e) {
throw new RuntimeException(e);
}
count++; //카운트를 증가시키고
publishProgress(count); //count 값을 발행한다.
}
//작업의 결과라고 가정
String result="Success!";
//리턴해주면
return result;
}
@Override
protected void onProgressUpdate(Integer... values) {
super.onProgressUpdate(values);
//values는 Integer[] 이다. 0번 방에 카운트 값이 들어있다.
//여기는 UI 스레드이기 때문에 UI 업데이트 가능
//textView.setText(values[0].toString());
textView.setText(Integer.toString(values[0])); //이렇게도 가능하다.
}
@Override
protected void onPostExecute(String s) {
super.onPostExecute(s);
textView.setText(s);
}
}
//필드에 Handler 객체를 생성해서 참조값을 넣어둔다. 단, handleMessage() 메소드를 재정의해서
Handler handler=new Handler(){
@Override
public void handleMessage(@NonNull Message msg) {
//여기는 UI 스레드이기 때문에 UI관련 작업을 할수있다.
editText.setText("작업이 종료되었습니다.");
}
};
/*
비동기 작업을 도와줄 클래스 설계하기
1. AsyncTask 추상 클래스를 상속받는다.
2. AsyncTask<파라미터 type, 진행중 type, 결과 type> 에 맞게끔
Generic 클래스를 잘 정의한다.
3. doInBackground() 메소드를 오버라이드한다.
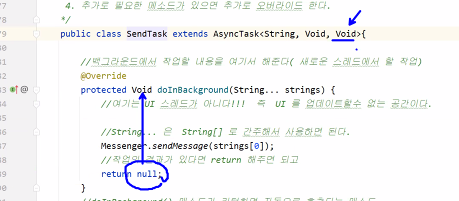
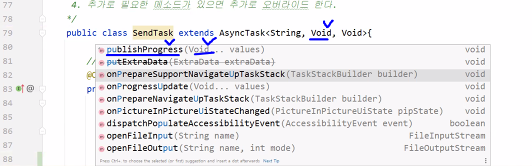
4. 추가로 필요한 메소드가 있으면 추가로 오버라이드한다.
*/
public class SendTask extends AsyncTask<String, Void, Void>{
//백그라운드에서 작업할 내용을 여기서 해준다(새로운 스레드에서 할 작업)
@Override
protected Void doInBackground(String... strings) {
//여기는 UI 스레드가 아니다!! 즉 UI를 업데이트할 수 없다.
//String... 은 String[] 로 간주해서 사용하면 된다.
Messenger.sendMessage(strings[0]);
//작업에 결과가 있다면 return 해주면 되고
return null;
}
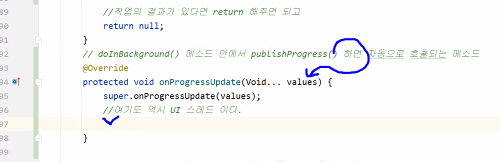
//doInBackGround() 메소드 안에서 publishProgress()
@Override
protected void onProgressUpdate(Void... values) {
super.onProgressUpdate(values);
//여기도 역시 UI 스레드이다.
}
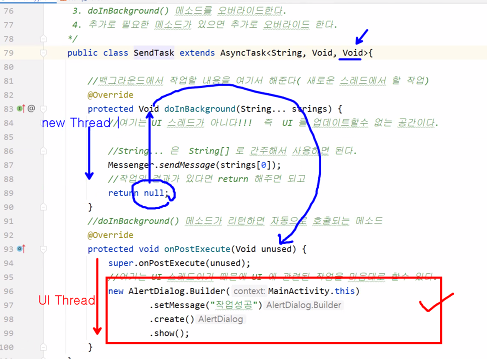
// doInBackground() 메소드가 리턴하면 자동으로 호출되는 메소드
@Override
protected void onPostExecute(Void unused) {
super.onPostExecute(unused);
//여기는 UI 스레드이기 때문에 UI에 관련된 작업을 마음대로 할 수 있다.
new AlertDialog.Builder(MainActivity.this)
.setMessage("작업성공")
.create()
.show();
}
}
}
activity_main.xml
<?xml version="1.0" encoding="utf-8"?>
<LinearLayout xmlns:android="http://schemas.android.com/apk/res/android"
    xmlns:app="http://schemas.android.com/apk/res-auto"
    xmlns:tools="http://schemas.android.com/tools"
    android:layout_width="match_parent"
    android:layout_height="match_parent"
    tools:context=".MainActivity"
    android:orientation="vertical">

    <EditText
        android:layout_width="match_parent"
        android:layout_height="wrap_content"
        android:hint="무언가 입력해 보세요..."
        android:id="@+id/editText"/>
    <Button
        android:layout_width="match_parent"
        android:layout_height="wrap_content"
        android:id="@+id/sendBtn"
        android:text="전송"/>
    <Button
        android:layout_width="match_parent"
        android:layout_height="wrap_content"
        android:id="@+id/testBtn"
        android:text="테스트 버튼"/>
    <Button
        android:layout_width="match_parent"
        android:layout_height="wrap_content"
        android:id="@+id/startBtn"
        android:text="카운트 시작"/>
    <TextView
        android:layout_width="match_parent"
        android:layout_height="match_parent"
        android:background="#00FF00"
        android:textSize="30sp"
        android:gravity="center"
        android:text="0"
        android:id="@+id/textView"/>

</LinearLayout>
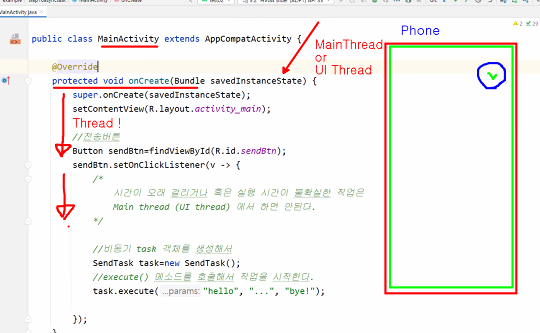
- 이 어플이 폰에 설치되어 있다가,
앱의 아이콘을 클릭하게 되면 활성화된다(초록)
- 앱이 활성화될때 처음 호출되는 메소드는 런처 액티비티의 onCreate()
- onCreate로 실행의 흐름이 들어온다. 이 실행의 흐름을 스레드라고 부른다.
- 안드로이드 앱을 실행하려면 최소 1개의 스레드가 필요한데,
이것을 Main thread / UI thread 라고 한다.
- onCreate()에 최초에 실행순서가 들어와서 실행되고, 종료되고 나면(빨강)
아래 버튼에 클릭 등 이벤트가 들어올 때 또 실행 흐름이 들어온다.(파랑)
→ 이것은 동일한 스레드이다.
- UI에 관련된 작업이 가능한 스레드는 오직 MainThread(UI Thread) 뿐이다.
- 아무데서나 UI를 조작할 수 없다. 원칙으로 정해져있다.

- 테스트 버튼 생성해서 다른 스레드에서도 UI에 관여할 수 있는지 테스트
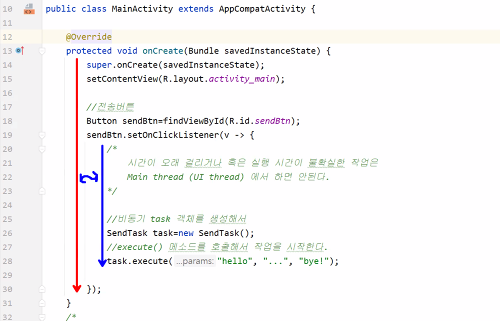
** Thread 사용법
- 새 스레드 객체를 생성해서 runnable type을 넣어주고,
.start() 를 호출하면 이곳이 새로운 스레드가 된다.

- 빨강색은 UI thread, 파랑색은 새 스레드.
- 새 스레드에서는 원칙적으로 문자열을 출력하거나 알림을 띄울 수 없다. 동작이 제한되어 있다.
- UI를 조작하는것은 오직 MainThead에서만 가능하다.
- 버튼을 누르는 것까지는 UI Thread의 흐름이다.
- onCreate에서 사용했던 스레드가 다시 순서가 들어오는 것이다.
- new Thread() 로 새 스레드를 생성하는 시점에서부터 새 스레드가 시작된 것!

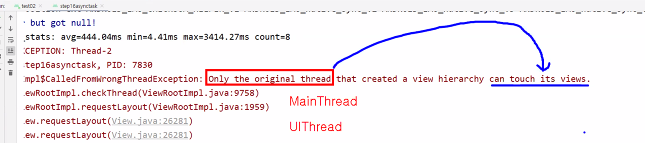
- 새 스레드에서 UI 관련된 코드를 넣어서 동작시키면?? 이렇게 앱이 종료되어 버린다.
- 에러 로그를 보면 오직 오리지널 스레드(MainThread)에서만 View에 관여할 수 있다고 나온다.
- 앱이 종료되어버려서 사용자의 요청에 대응할 수 없다. UI를 업데이트할 수 없다.
- 이 경우 대처방법은? 필드에 핸들러를 생성한다.

- 익명클래스에서 override 하기

- sendEmptyMessage() 메소드를 호출하면 간접적으로 이 메소드가 호출된다.
- 이 메소드가 호출되는 스레드는 메인 스레드이다.
- UI 스레드에서는 UI를 업데이트할 수 없으니,
필드에 Handler 메소드를 만들어놓고, 핸들러에다가 메시지를 보내는 것이다.
- 핸들 메시지를 보낸다 → 핸들러는 메인 스레드이므로 저기서는 UI 업데이트가 가능하다.
- EditText를 필드로만들고, handler메소드 안에서 UI 작업을 한다.
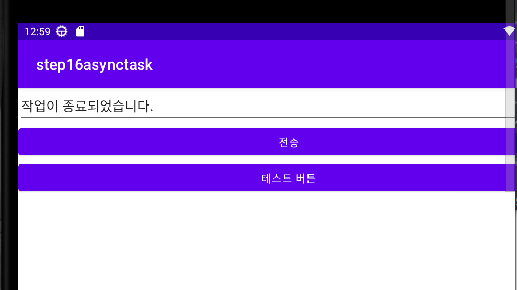
- editText에 출력된다. UI가 업데이트되었다!!
* 안드로이드 개발 툴에서 Deprecate 된다는것...
- 사용하다가 문제 발견 → 제거(Deprecate) → 대체할 객체 사용 → 문제 발견 → 제거 → 일단 다른 대체제라도 써봐...
- handler 에서 Asynctask 으로. 이제 Asynctask도 제거되었으면 다음은..?
- Handler 사용의 불편함. 핸들러 만들고 객체도 보내고 ...
- 작업이 중간중간 업데이트해야 할 수도 있고 끝났을 때 결과물을 또 보내야 할 수도 있는데
핸들러를 사용하는 건 번거로운 작업이다. 코드가 꼬인다.
- 그래서 대체재로 나왔던 것이 AsyncTask이다.
- AsyncTask 객체 생성, execute() 메소드 실행 → doinBackGround 로 자동으로 순서 들어옴 → 이 안에서 새로운 스레드가 실행됨
- 시간이 오래 걸리거나 불확실한 작업은 이 새로운 스레드에서 해준다.
- 결과값이 있으면 리턴해준다. 지금은 void
- 결과값이 있으면 onPostExecute() 로 들어간다.
- 이곳은 UI Thread 이다. 여기서는 작업의 결과를 가지고 UI를 업데이트할 수 있다.

- 3개의 <> 제너릭 타입 : 각각 파라미터, 진행중, 결과 타입
- 비동기작업을 시작시키면서 값을 전달해야 할 때 타입을 결정
- 이것이 파라미터의 타입을 결정한다.
- 진행중 타입 : 작업을 하는 중간중간에 사용하는 타입
- 작업 중간중간에 보고하는 것이 있을 수 있다. publishProGress() 메소드로 출력한다.
- 이 메소드를 사용하면 작업 중간중간에도 UI를 업데이트시켜줄 수 있다.

- 진행중 타입을 integer로 바꿨다고 가정하면,
작업 중간중간 숫자 타입의 값을 onProgressUpdate() 에서 출력해줄 수 있다.
- AsyncTask는 자동으로 메소드가 호출되면서 그 메소드가 UI 스레드라는 점이 장점이다.
따로 핸들러를 사용하지 않아도 되어서 편하다.
- 결과타입(최종적으로 리턴되는 것의 타입) : onPostExecute() 에 값을 전달할 수 있다.
- 새 textView 만들기
- 클릭하면 TextView의 숫자가 1초마다 1씩 숫자가 늘어나고 10이 되면 알림 보내기
- 작업 중간중간 값 발행이 필요하다. UI의 업데이트가 필요하다!
- CountTask 클래스 생성해서 AsyncTask 상속
- textView, 버튼 참조값 얻어오고 버튼에 리스너 지정
- doinBackGround() 메소드를 만들어서 별도의 스레드로 진행
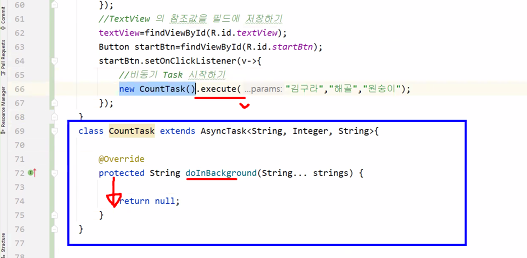
- 객체를 생성한 다음 excute() 메소드를 호출하면 된다.
그러면 아래에 패러미터 값이 전달되면서 실행된다.
- strings는 String[ ] 이다. 전달된 파라미터는 배열에 순서대로 저장되어 있다.

- 카운트를 증가시키고 UI에 표시해주어야 하는데, 여기는 새 스레드라서 UI 수정을 못한다.
- publishProgress(count); 로 카운트 값을 발행한다. (진행 중에)
- 1초에 한번씩 count 값이 publish된다.
- 아래에서 onProgressUpdate 를 오버라이드
→ 여기는 MainThread여서 UI 업데이트가 가능하다.
- 제너릭<> 안의 타입은 클래스 타입으로 넣어주어야 한다. int 는 쓸 수 없고 Integer 라고 써야 한다.

- 이 안에 들어가는 int 인자는 resId 리소스 정수값을 가리킨다. 이것은 결국 String이다.(R.id.xxx 로 입력된다)
- int를 받는다고 되어있어도 이 안에 values[0] 등을 넣으면 오류가 발생한다.


textView.setText(values[0].toString());

textView.setText(Integer.toString(values[0]));
- 이런 식으로 Integer를 String으로! 둘중 하나로 쓰면 된다.

- 값이 1초마다 한번씩 values에 전달되고 textview에 출력된다.
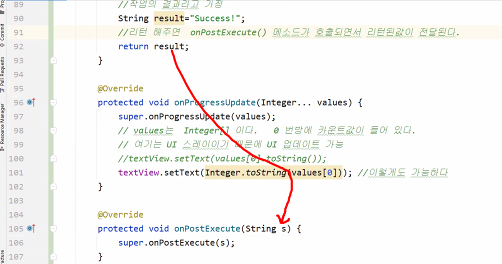
- 결과 데이터 result 는 이 onPostExecute() 메소드로 들어온다.

- 백그라운드에서 작업하면서도 UI가 바로바로 업데이트된다.
- AsyncTask의 대표적인 예제
- 코틀린의 코루틴(Coroutines)을 이용하면 이런 비동기 작업을 쉽게 할 수 있다.
- java의 새 라이브러리를 익히는 것보다 코틀린 코딩을 활용하는 게 쉬울지도..!
'국비교육(22-23)' 카테고리의 다른 글
| 77일차(3)/Android App(39) : Http POST방식 요청하기(2) (0) | 2023.01.30 |
|---|---|
| 77일차(2)/Android App(38) : Http POST방식 요청하기(1) (0) | 2023.01.27 |
| 76일차(4)/Android App(36) : AsyncTask(1) (0) | 2023.01.27 |
| 76일차(3)/Android App(35) : WebView (1) | 2023.01.26 |
| 76일차(2)/Android App(34) : SQLite 활용(2) (0) | 2023.01.26 |