60일차(1)/Spring Boot(8) : Spring 프로젝트 Spring Boot로 이식하기 / Boot에서 war파일 생성(2)
* Spring 프로젝트 Boot 로 이식 중!
- 갤러리 기능 가져오기
- 카페 기능 가져오기
- 자료실(File) 기능 가져오기
- Transaction(shop) 기능 가져오기
* gitHub : 링크
- Member 기능 이식해왔던 내용 리뷰
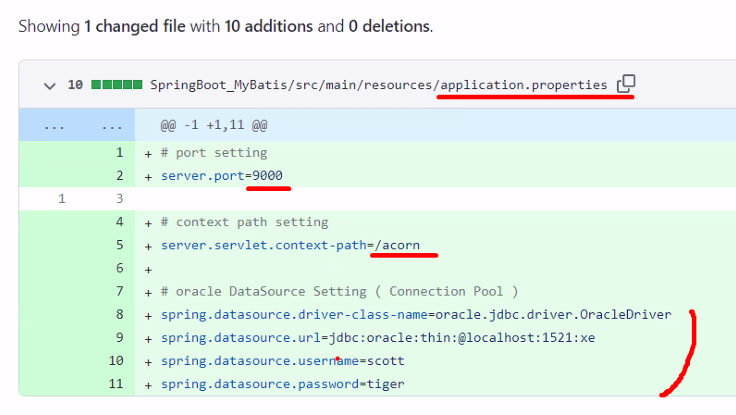
* application.properties 에 설정해야 하는 값
- 포트번호 설정
- path 에 경로 명시
3) DB 로그인정보
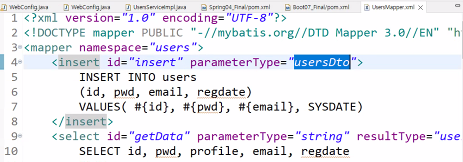
- mapper폴더 만들어서 MemberMapper 만들기
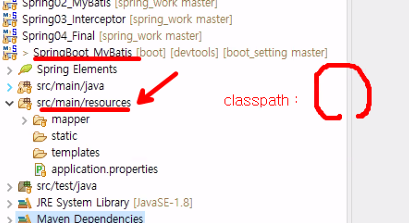
- resources/ 폴더의 위치는 classpath: 이다
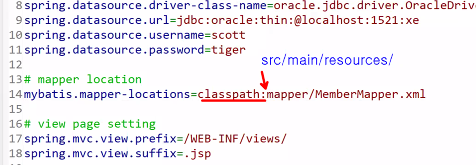
- application.properties에 mapper의 위치 설정한 곳으로 명시!
- DataSource 설정과 mapper 설정을 마치면 mybatis를 사용할 준비가 된 것이다.
→ 즉 dao에 sqlSession의 값이 들어온다는 것이다.
- pom.xml 에 mybatis 설정 + application.properties에 DataSource 설정 + mapper 경로 기록
- spring boot에서도 앞에서 만들었던 프로젝트와 똑같은 방식으로 만들 예정이다.
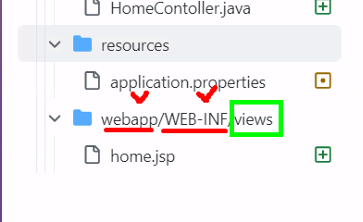
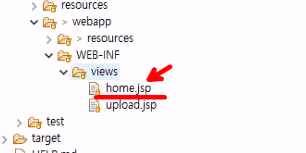
- 그러려면 src-main 폴더 안에 webapp-WEB-INF 폴더를 생성
- webapp, WEB-INF는 폴더명을 바꿀 수 없다. 대,소문자 구분 정확하게!
- views 폴더는 이름을 마음대로 지을 수 있다.

- get방식 요청 컨트롤러에서 작성하는 법
- Spring 5.0 (boot) 를 사용하면서 @GetMapping을 쓸 수 있게 되었다.
- 좀더 편리하게 사용할 수 있도록 새 어노테이션이 추가되었다.
- request 인자를 전달받는 것
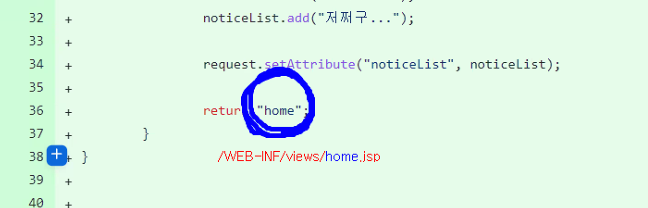
- 뷰 페이지 정보를 리턴해준 것인데,
해당 문자열이 포워드 이동할 뷰 페이지의 위치를 알려준다. 접두어, 접미어가 알아서 붙는다.

- 기존 Legacy Project에서는 이 설정을 servlet-context.xml에서 했는데,
- Boot에서는 application.properties 에서 한다.
- 레거시 프로젝트 방식으로 응답하려면 위 내용이 application.properties에 있고
뷰페이지 폴더 설정을 해주어야 한다.
- webapp이 없으므로, 직접 폴더를 만들어주고 구성해주어야 한다.
- 웹페이지에서 응답할 수 있도록 해준 것이다.
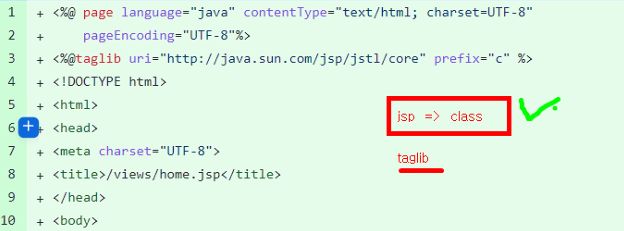
- jsp는 결국 class로 바뀐다.
- jsp에서 사용하는 taglib도 spring boot에서 사용하려면 라이브러리가 있어야 한다.
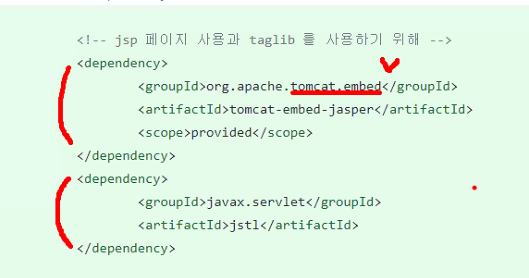
- 그런데 바꾸어주는 기본 기능이 spring boot에는 없다.
- 이 기능이 기본으로 들어있는 것이 아니기 때문에 이 의존 dependency 추가가 필요하다.
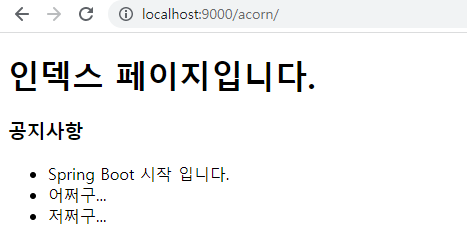
- Run 해보면 localhost:9000/acorn/ 이 경로에 대해서 HomeController 가 동작하는 것을 볼 수 있다.
- sqlSession 주입받기
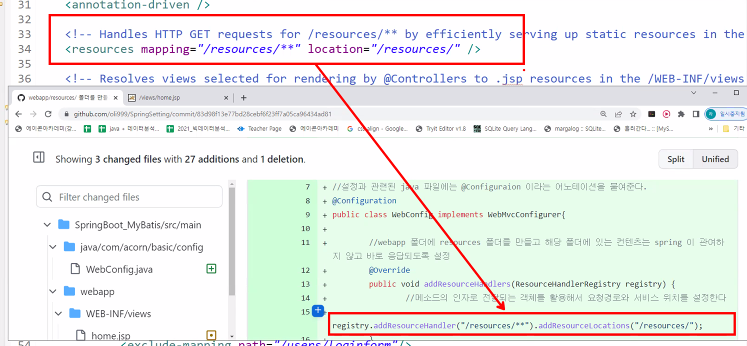
- resources 폴더 안에 있는 내용은 컨트롤러를 거치지 않도록 하는 설정
WebConfig (전체)
package com.sy.boot07.config;
import org.springframework.beans.factory.annotation.Autowired;
import org.springframework.context.annotation.Configuration;
import org.springframework.web.servlet.config.annotation.InterceptorRegistry;
import org.springframework.web.servlet.config.annotation.ResourceHandlerRegistry;
import org.springframework.web.servlet.config.annotation.WebMvcConfigurer;
import com.sy.boot07.interceptor.LoginInterceptor;
@Configuration
public class WebConfig implements WebMvcConfigurer{
//로그인 인터셉터 주입 받기
@Autowired LoginInterceptor loginInterceptor;
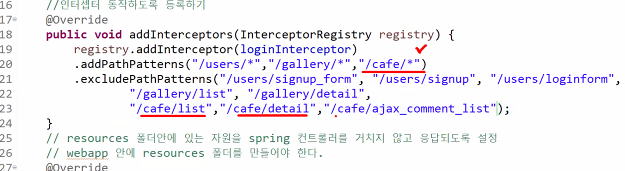
//인터셉터 동작하도록 등록하기
@Override
public void addInterceptors(InterceptorRegistry registry) {
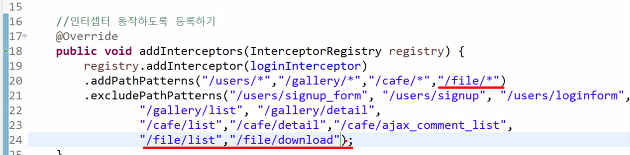
registry.addInterceptor(loginInterceptor)
.addPathPatterns("/users/*","/gallery/*","/cafe/*","/file/*")
.excludePathPatterns("/users/signup_form", "/users/signup", "/users/loginform", "/users/login",
"/gallery/list", "/gallery/detail",
"/cafe/list","cafe/detail","/cafe/ajax_comment_list",
"/file/list","/file/download");
}
// resources 폴더안에 있는 자원을 spring 컨트롤러를 거치지 않고 응답되도록 설정
// webapp 안에 resources 폴더를 만들어야 한다.
@Override
public void addResourceHandlers(ResourceHandlerRegistry registry) {
registry.addResourceHandler("/resources/**").addResourceLocations("/resources/");
}
}
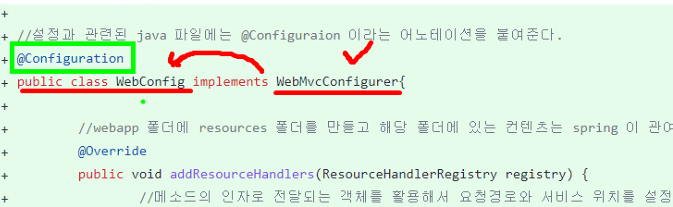
- @Configutation 어노테이션을 붙이고 + 메소드 override하기
- registry 객체를 전달받아서 사용하는 addResourceHandler 메소드 사용
- 레거시 프로젝트에서는 이 설정에 해당된다.
- 레거시 프로젝트와 작성방식을 비교해보기!(servlet-context사용)
- 리소스 폴더 안에 있는 내용은 스프링 컨트롤러를 거치지 않고 바로 응답되도록 하기!
- 파일 업로드 기능
- 사이즈 제한이 있으므로 application.properties에 미리 설정해주기
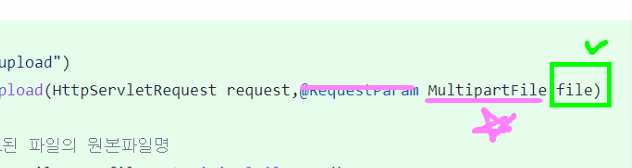
- 값을 받아올 때, 변수명을 input의 name값과 같게 해주기
- @RequestParam 은 생략 가능하다.
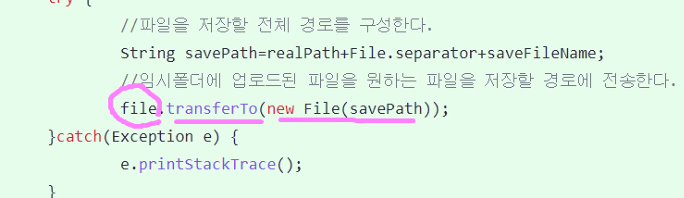
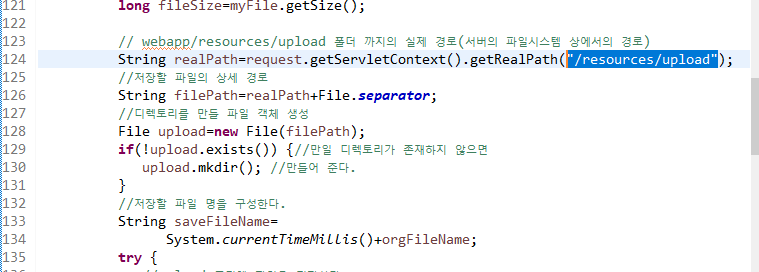
upload까지의 realPath를 얻어와서 resource 폴더에 원하는 파일명으로 업로드하도록 할수있다.
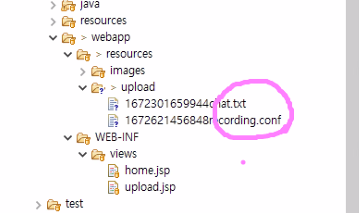
- Spring boot는 업로드 폴더에 파일이 들어가 있다.
- boot에서는 프로젝트상에서 보이는 이 upload 폴더를 실제로 사용한다.
- 하지만 이 upload 폴더의 파일이 git의 변경사항으로 잡히면 좋을게없다.
- 기존 레거시 프로젝트: 외부 tomcat으로 돌리기때문에, 외부 tomcat의 위치에서 잡힌다.
(실제로 그 upload 폴더를 사용하지는 않았다.)
- 하지만 boot에서는 실제로 사용한다.
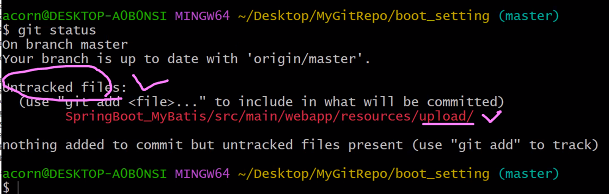
- 해당 폴더에 파일이 들어가면 git에서도 변동사항으로 잡힌다.
- 하지만 커밋하지 않는 것이 좋다(개별 파일은 필요없으므로)
- 따라서 .gitignore에서 upload 폴더의 내용은 무시하라고 설정해주어야 한다.
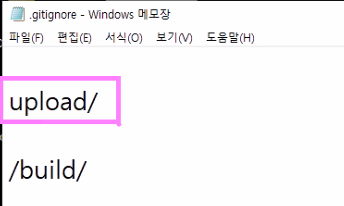
- 이렇게 추가하면 upload 폴더 하위의 모든 내용은 git의 변동사항 추적에서 무시된다.
- 이클립스를 다시 열어보면 무시되는 것으로 나온다.
새 프로젝트생성
- Boot07_Final / 패키지명 spring.sy.boot07
- web/mybatis/devtools/oracle : 4개 체크하기
application.properties (전체)
# port setting
server.port=9000
# context path setting
server.servlet.context-path=/boot07
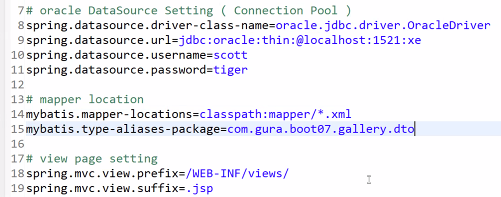
# oracle DataSource Setting (Connection Pool)
spring.datasource.driver-class-name=oracle.jdbc.driver.OracleDriver
spring.datasource.url=jdbc:oracle:thin:@localhost:1521:xe
spring.datasource.username=scott
spring.datasource.password=tiger
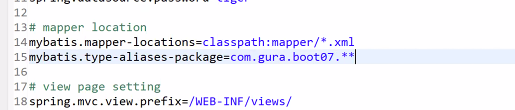
# mapper location
mybatis.mapper-locations=classpath:mapper/*.xml
mybatis.type-aliases-package=com.sy.boot07.**
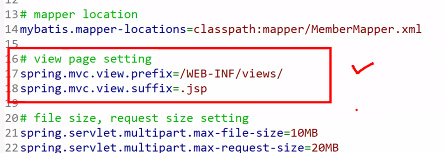
# view page prefix suffix setting
spring.mvc.view.prefix=/WEB-INF/views/
spring.mvc.view.suffix=.jsp
# file size, request size setting
spring.servlet.multipart.max-file-size=10MB
spring.servlet.multipart.max-request-size=20MB

- 여러개만들어도 인식되도록 * 로 작성할 수 있다.
- home.jsp, homecontroller, pom.xml에 jsp 라이브러리 추가
<!-- jsp 페이지 사용과 taglib 를 사용하기 위해 -->
    <dependency>
        <groupId>org.apache.tomcat.embed</groupId>
        <artifactId>tomcat-embed-jasper</artifactId>
        <scope>provided</scope>
    </dependency>
    <dependency>
        <groupId>javax.servlet</groupId>
        <artifactId>jstl</artifactId>
    </dependency>
- interceptor 패키지 생성
- 메인 패키지가 있으면 하위패키지에는 자동으로 componet scan 이 일어나므로,
@Component 어노테이션만 붙여주면 된다.
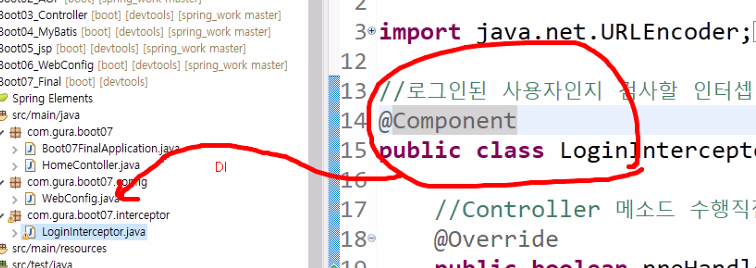
- interceptor 설정: WebConfig에서 DI 주입받을 수 있도록 bean으로 만들기!
- WebConfig 생성 (전체)
package com.sy.boot07.config;

import org.springframework.beans.factory.annotation.Autowired;
import org.springframework.context.annotation.Configuration;
import org.springframework.web.servlet.config.annotation.InterceptorRegistry;
import org.springframework.web.servlet.config.annotation.ResourceHandlerRegistry;
import org.springframework.web.servlet.config.annotation.WebMvcConfigurer;

import com.sy.boot07.interceptor.LoginInterceptor;

@Configuration
public class WebConfig implements WebMvcConfigurer{
	//로그인 인터셉터 주입 받기
	@Autowired LoginInterceptor loginInterceptor;

	//인터셉터 동작하도록 등록하기
	@Override
	public void addInterceptors(InterceptorRegistry registry) {
		registry.addInterceptor(loginInterceptor)
		.addPathPatterns("/users/*","/gallery/*","/cafe/*","/file/*")
		.excludePathPatterns("/users/signup_form", "/users/signup", "/users/loginform", "/users/login",
				"/gallery/list", "/gallery/detail",
				"/cafe/list","cafe/detail","/cafe/ajax_comment_list",
				"/file/list","/file/download");
	}
	// resources 폴더안에 있는 자원을 spring 컨트롤러를 거치지 않고 응답되도록 설정
	// webapp 안에 resources 폴더를 만들어야 한다.
	@Override
	public void addResourceHandlers(ResourceHandlerRegistry registry) {
		registry.addResourceHandler("/resources/**").addResourceLocations("/resources/");
	}
}
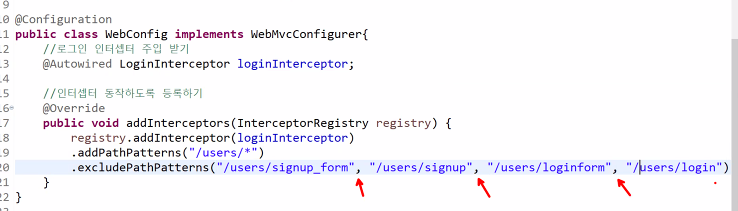
- interceptor를 등록할 때 여러개의 경로를 , 로 이어서 등록 가능하다.
@Autowired LoginInterceptor loginInterceptor;
- component 스캔으로 bean 으로 만들고, WebConfig 에서 인터셉터를 주입받아 설정한다.
- exclude 매핑도 여기서 설정한다.

- bean이 되는 방법, mapping 설정 두가지 / Spring과 Boot를 비교해서 보기!

- addResourseHandler도 override 해준다.
- webapp 안에 resources, upload 폴더를 생성
- users 관련 패키지 4종 복사해와서 이름 boot07로 바꿔주기
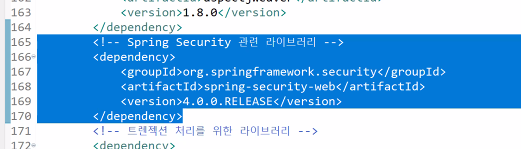
- 로그인 검증을 위한 라이브러리. security 관련 디펜던시 추가
        <!-- Spring Security 관련 라이브러리 -->
        <dependency>
          <groupId>org.springframework.security</groupId>
          <artifactId>spring-security-web</artifactId>
          <version>4.0.0.RELEASE</version>
      </dependency>
- mapper 추가
- 그런데 현재 타입알리어스를 설정할 곳이 없다.
- 일단 그대로 사용하는 것으로 고쳐주기
* 갤러리 기능 boot로 수정하기
- 갤러리 뷰페이지 views에 추가
- GalleryMapper추가
- 4개 패키지 복사해서 리네이밍(alt+shift+R)
- typealias 인식시키기
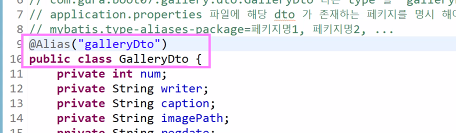
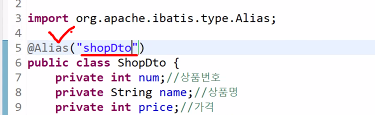
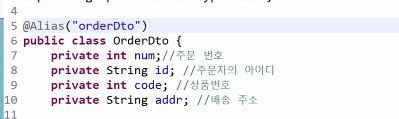
- dto 상단에 @Alias 어노테이션을 붙이고,
이것을 어떤 타입알리어스로 쓸 것인지 뒤에 직접 작성해서 지정 가능
- com.sy.boot07.gallery.dto.GalleryDto라는 type을 galleryDto type alias로 사용하기 위한 어노테이션 붙이기
- application.properties 파일에 해당 dto가 존재하는 패키지를 명시하기
(mybatis.type-aliases-package=패키지명1, 패키지명2, ...)
mybatis.type-aliases-package= mapper명(패키지명까지)
- 이렇게 적어주는 것이 좋다.
- 등록할 mapper alias가 여러 개인 경우, *을 이용하면 한번만 입력해서 전체에 다 적용할 수도 있다.
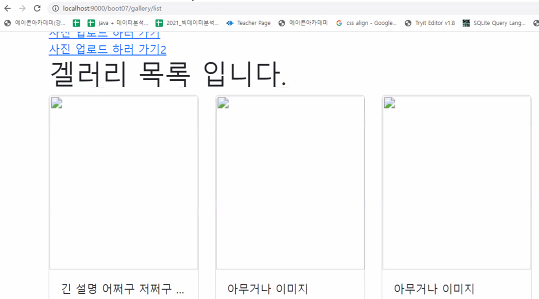
- 이전과 저장한 경로가 다르기 때문에 사진은 뜨지 않지만, 연결된다.
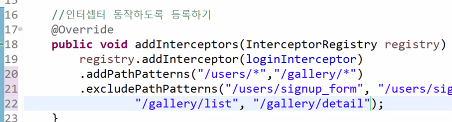
- interceptor에 갤러리 경로추가
list, detail 페이지는 로그인하면 으로 이동하도록 인터셉터 설정
[ mapper의 typealias 설정방법 ]
- application.properties 에 위치 알려주기
- DTO에 @Alias 어노테이션 붙여서 알려주기
- Spring Boot도 크게 다르지 않다. interceptor, resource 설정이 좀 다르고
application.properties 에다가 datasource, mapper location, view 페이지 설정을 한다는 점이 다를 뿐!
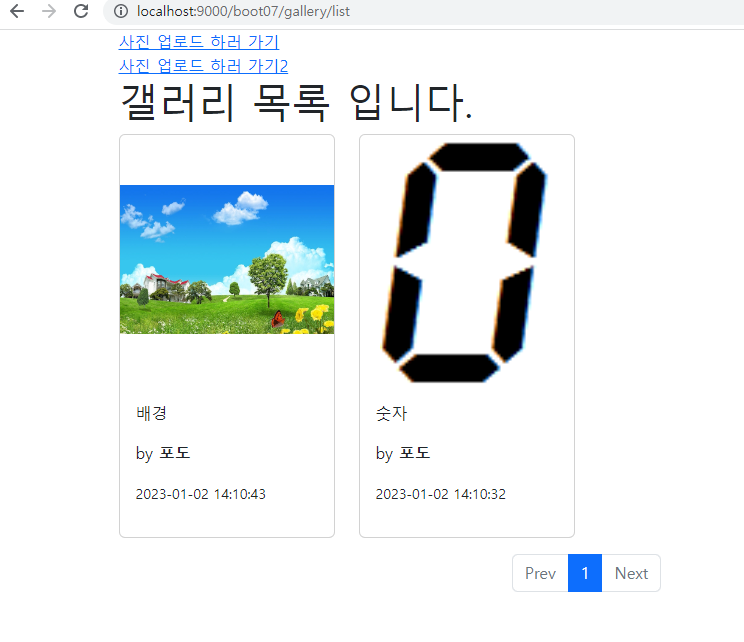
- 파일이 정상적으로 업로드된다.
* cafe, file 기능도 옮겨오기

- view page, mapper를 추가해주기
- CafeServiceImpl을 복사하면 오류가생기는데, exception 때문
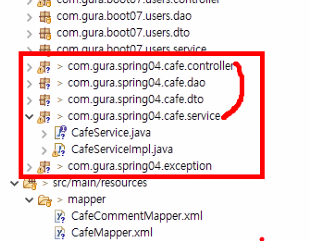
- 4개의 패키지와 exception을 같이 복사해온다.
@Alias("cafeDto")
@Alias("cafeCommentDto")
어노테이션을 붙여준다.

- application.properties에 cafeDto도 추가

- resources 폴더에 SmartEditor 폴더도 가져와주기
- webconfig 에 interceptor에서 제외할 내용 추가
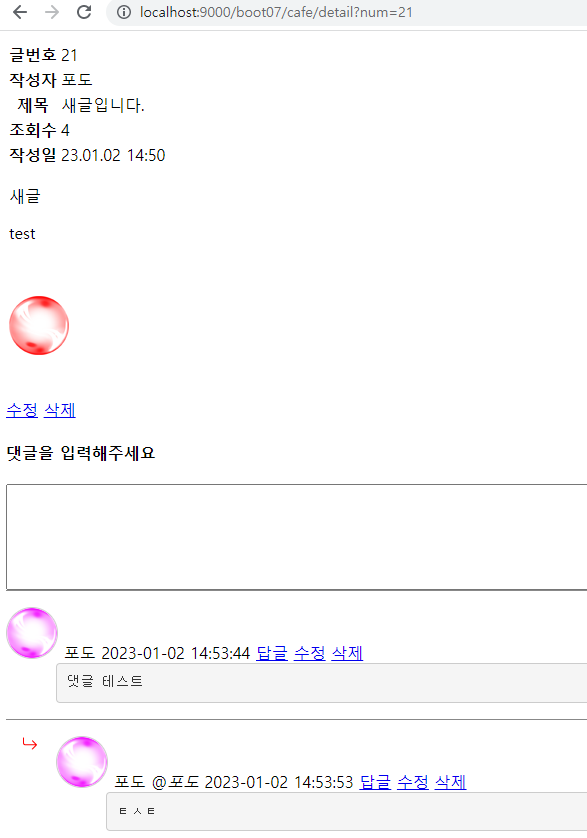
- 정상적으로 글, 댓글이 작성된다.
*기존 버그 수정
- 댓글 전체 페이지 개수(totalPageNum) 는 댓글이 하나도 없을 때 0으로 나온다.
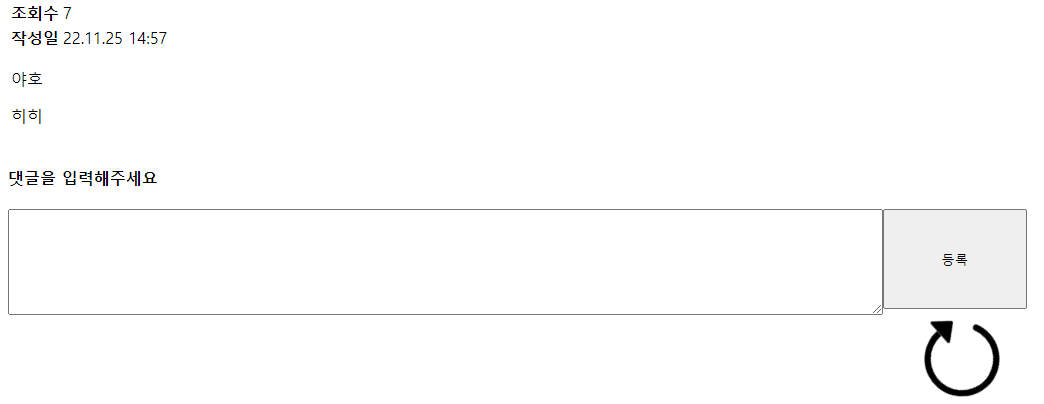
- 그런데 0일 때에도, 스크롤 창이 작을때는 저 화살표가 나오는 오류가 있다.
detail.jsp에서 수정해주기
<%@ page language="java" contentType="text/html; charset=UTF-8"
pageEncoding="UTF-8"%>
<%@taglib uri="http://java.sun.com/jsp/jstl/core" prefix="c" %>
<!DOCTYPE html>
<html>
<head>
<meta charset="UTF-8">
<title>/views/cafe/detail.jsp</title>
<link rel="stylesheet" href="https://cdnjs.cloudflare.com/ajax/libs/animate.css/4.1.1/animate.min.css"/>
<style>
.content{
border: 1px dotted gray;
}
/* 댓글 프로필 이미지를 작은 원형으로 만든다. */
.profile-image{
width: 50px;
height: 50px;
border: 1px solid #cecece;
border-radius: 50%;
}
/* ul 요소의 기본 스타일 제거 */
.comments ul{
padding: 0;
margin: 0;
list-style-type: none;
}
.comments dt{
margin-top: 5px;
}
.comments dd{
margin-left: 50px;
}
.comment-form textarea, .comment-form button{
float: left;
}
.comments li{
clear: left;
}
.comments ul li{
border-top: 1px solid #888;
}
.comment-form textarea{
width: 84%;
height: 100px;
}
.comment-form button{
width: 14%;
height: 100px;
}
/* 댓글에 댓글을 다는 폼과 수정폼은 일단 숨긴다. */
.comments .comment-form{
display: none;
}
/* .reply_icon 을 li 요소를 기준으로 배치 하기 */
.comments li{
position: relative;
}
.comments .reply-icon{
position: absolute;
top: 1em;
left: 1em;
color: red;
}
pre {
display: block;
padding: 9.5px;
margin: 0 0 10px;
font-size: 13px;
line-height: 1.42857143;
color: #333333;
word-break: break-all;
word-wrap: break-word;
background-color: #f5f5f5;
border: 1px solid #ccc;
border-radius: 4px;
}
.loader{
/* 로딩 이미지를 가운데 정렬하기 위해 */
text-align: center;
/* 일단 숨겨 놓기 */
display: none;
}
.loader svg{
animation: rotateAni 1s ease-out infinite;
}
@keyframes rotateAni{
0%{
transform: rotate(0deg);
}
100%{
transform: rotate(360deg);
}
}
</style>
</head>
<body>
<div class="container">
<%-- 만일 이전글(더 옛날글)의 글번호가 0 가 아니라면(이전글이 존재 한다면) --%>
<c:if test="${dto.prevNum ne 0}">
<a href="detail?num=${dto.prevNum }&condition=${condition}&keyword=${encodedK}">이전글</a>
</c:if>
<%-- 만일 다음글(더 최신글)의 글번호가 0 가 아니라면(다음글이 존재 한다면) --%>
<c:if test="${dto.nextNum ne 0 }">
<a href="detail?num=${dto.nextNum }&condition=${condition}&keyword=${encodedK}">다음글</a>
</c:if>
<%-- 만일 검색 키워드가 있다면 --%>
<c:if test="${not empty keyword }">
<p>
<strong>${condition }</strong> 조건
<strong>${keyword }</strong> 검색어로 검색된 내용 자세히 보기
</p>
</c:if>
<h3>글 상세 보기</h3>
<table>
<tr>
<th>글번호</th>
<td>${dto.num }</td>
</tr>
<tr>
<th>작성자</th>
<td>${dto.writer }</td>
</tr>
<tr>
<th>제목</th>
<td>${dto.title }</td>
</tr>
<tr>
<th>조회수</th>
<td>${dto.viewCount }</td>
</tr>
<tr>
<th>작성일</th>
<td>${dto.regdate }</td>
</tr>
<tr>
<td colspan="2">
<div>${dto.content }</div>
</td>
</tr>
</table>
<c:if test="${sessionScope.id eq dto.writer }">
<a href="updateform?num=${dto.num }">수정</a>
<a href="javascript:" onclick="deleteConfirm()">삭제</a>
<script>
function deleteConfirm(){
const isDelete=confirm("이 글을 삭제 하겠습니까?");
if(isDelete){
location.href="delete?num=${dto.num}";
}
}
</script>
</c:if>
<h4>댓글을 입력해주세요</h4>
<!-- 원글에 댓글을 작성할 폼 -->
<form class="comment-form insert-form" action="comment_insert" method="post">
<!-- 원글의 글번호가 댓글의 ref_group 번호가 된다. -->
<input type="hidden" name="ref_group" value="${dto.num }"/>
<!-- 원글의 작성자가 댓글의 대상자가 된다. -->
<input type="hidden" name="target_id" value="${dto.writer }"/>
<textarea name="content">${empty id ? '댓글 작성을 위해 로그인이 필요 합니다.' : '' }</textarea>
<button type="submit">등록</button>
</form>
<!-- 댓글 목록 -->
<div class="comments">
<ul>
<c:forEach var="tmp" items="${commentList }">
<c:choose>
<c:when test="${tmp.deleted eq 'yes' }">
<li>삭제된 댓글 입니다.</li>
</c:when>
<c:otherwise>
<c:if test="${tmp.num eq tmp.comment_group }">
<li id="reli${tmp.num }">
</c:if>
<c:if test="${tmp.num ne tmp.comment_group }">
<li id="reli${tmp.num }" style="padding-left:50px;">
<svg class="reply-icon" xmlns="http://www.w3.org/2000/svg" width="16" height="16" fill="currentColor" class="bi bi-arrow-return-right" viewBox="0 0 16 16">
<path fill-rule="evenodd" d="M1.5 1.5A.5.5 0 0 0 1 2v4.8a2.5 2.5 0 0 0 2.5 2.5h9.793l-3.347 3.346a.5.5 0 0 0 .708.708l4.2-4.2a.5.5 0 0 0 0-.708l-4-4a.5.5 0 0 0-.708.708L13.293 8.3H3.5A1.5 1.5 0 0 1 2 6.8V2a.5.5 0 0 0-.5-.5z"/>
</svg>
</c:if>
<dl>
<dt>
<c:if test="${ empty tmp.profile }">
<svg class="profile-image" xmlns="http://www.w3.org/2000/svg" width="16" height="16" fill="currentColor" class="bi bi-person-circle" viewBox="0 0 16 16">
<path d="M11 6a3 3 0 1 1-6 0 3 3 0 0 1 6 0z"/>
<path fill-rule="evenodd" d="M0 8a8 8 0 1 1 16 0A8 8 0 0 1 0 8zm8-7a7 7 0 0 0-5.468 11.37C3.242 11.226 4.805 10 8 10s4.757 1.225 5.468 2.37A7 7 0 0 0 8 1z"/>
</svg>
</c:if>
<c:if test="${not empty tmp.profile }">
<img class="profile-image" src="${pageContext.request.contextPath}${tmp.profile }"/>
</c:if>
<span>${tmp.writer }</span>
<c:if test="${tmp.num ne tmp.comment_group }">
@<i>${tmp.target_id }</i>
</c:if>
<span>${tmp.regdate }</span>
<a data-num="${tmp.num }" href="javascript:" class="reply-link">답글</a>
<c:if test="${ (id ne null) and (tmp.writer eq id) }">
<a data-num="${tmp.num }" class="update-link" href="javascript:">수정</a>
<a data-num="${tmp.num }" class="delete-link" href="javascript:">삭제</a>
</c:if>
</dt>
<dd>
<pre id="pre${tmp.num }">${tmp.content }</pre>
</dd>
</dl>
<form id="reForm${tmp.num }" class="animate__animated comment-form re-insert-form" action="comment_insert" method="post">
<input type="hidden" name="ref_group" value="${dto.num }"/>
<input type="hidden" name="target_id" value="${tmp.writer }"/>
<input type="hidden" name="comment_group" value="${tmp.comment_group }"/>
<textarea name="content"></textarea>
<button type="submit">등록</button>
</form>
<c:if test="${tmp.writer eq id }">
<form id="updateForm${tmp.num }" class="comment-form update-form" action="comment_update" method="post">
<input type="hidden" name="num" value="${tmp.num }" />
<textarea name="content">${tmp.content }</textarea>
<button type="submit">수정</button>
</form>
</c:if>
</li>
</c:otherwise>
</c:choose>
</c:forEach>
</ul>
</div>
<div class="loader">
<svg xmlns="http://www.w3.org/2000/svg" width="100" height="100" fill="currentColor" class="bi bi-arrow-clockwise" viewBox="0 0 16 16">
<path fill-rule="evenodd" d="M8 3a5 5 0 1 0 4.546 2.914.5.5 0 0 1 .908-.417A6 6 0 1 1 8 2v1z"/>
<path d="M8 4.466V.534a.25.25 0 0 1 .41-.192l2.36 1.966c.12.1.12.284 0 .384L8.41 4.658A.25.25 0 0 1 8 4.466z"/>
</svg>
</div>
</div>
<script src="${pageContext.request.contextPath}/resources/js/sy_util.js"></script>
<script>
//클라이언트가 로그인 했는지 여부
let isLogin=${ not empty id };
document.querySelector(".insert-form")
.addEventListener("submit", function(e){
//만일 로그인 하지 않았으면
if(!isLogin){
//폼 전송을 막고
e.preventDefault();
//로그인 폼으로 이동 시킨다.
location.href=
"${pageContext.request.contextPath}/users/loginform?url=${pageContext.request.contextPath}/cafe/detail?num=${dto.num}";
}
});
/*
detail
페이지 로딩 시점에 만들어진 1 페이지에 해당하는
댓글에 이벤트 리스너 등록 하기
*/
addUpdateFormListener(".update-form");
addUpdateListener(".update-link");
addDeleteListener(".delete-link");
addReplyListener(".reply-link");
//댓글의 현재 페이지 번호를 관리할 변수를 만들고 초기값 1 대입하기
let currentPage=1;
//마지막 페이지는 totalPageCount 이다.
<%-- 댓글의 개수가 0일때 오류를 방지하기 위해 --%>
let lastPage=${ totalPageCount eq 0 ? 1 : totalPageCount};
//추가로 댓글을 요청하고 그 작업이 끝났는지 여부를 관리할 변수
let isLoading=false; //현재 로딩중인지 여부
/*
window.scrollY => 위쪽으로 스크롤된 길이
window.innerHeight => 웹브라우저의 창의 높이
document.body.offsetHeight => body 의 높이 (문서객체가 차지하는 높이)
*/
window.addEventListener("scroll", function(){
//바닥 까지 스크롤 했는지 여부
const isBottom =
window.innerHeight + window.scrollY >= document.body.offsetHeight;
//현재 페이지가 마지막 페이지인지 여부 알아내기
let isLast = currentPage == lastPage;
//현재 바닥까지 스크롤 했고 로딩중이 아니고 현재 페이지가 마지막이 아니라면
if(isBottom && !isLoading && !isLast){
//로딩바 띄우기
document.querySelector(".loader").style.display="block";
//로딩 작업중이라고 표시
isLoading=true;
//현재 댓글 페이지를 1 증가 시키고
currentPage++;
/*
해당 페이지의 내용을 ajax 요청을 통해서 받아온다.
"pageNum=xxx&num=xxx" 형식으로 GET 방식 파라미터를 전달한다.
*/
ajaxPromise("ajax_comment_list","get",
"pageNum="+currentPage+"&num=${dto.num}")
.then(function(response){
//json 이 아닌 html 문자열을 응답받았기 때문에 return response.text() 해준다.
return response.text();
})
.then(function(data){
//data 는 html 형식의 문자열이다.
console.log(data);
// beforebegin | afterbegin | beforeend | afterend
document.querySelector(".comments ul")
.insertAdjacentHTML("beforeend", data);
//로딩이 끝났다고 표시한다.
isLoading=false;
//새로 추가된 댓글 li 요소 안에 있는 a 요소를 찾아서 이벤트 리스너 등록 하기
addUpdateListener(".page-"+currentPage+" .update-link");
addDeleteListener(".page-"+currentPage+" .delete-link");
addReplyListener(".page-"+currentPage+" .reply-link");
//새로 추가된 댓글 li 요소 안에 있는 댓글 수정폼에 이벤트 리스너 등록하기
addUpdateFormListener(".page-"+currentPage+" .update-form");
//로딩바 숨기기
document.querySelector(".loader").style.display="none";
});
}
});
//인자로 전달되는 선택자를 이용해서 이벤트 리스너를 등록하는 함수
function addUpdateListener(sel){
//댓글 수정 링크의 참조값을 배열에 담아오기
// sel 은 ".page-xxx .update-link" 형식의 내용이다
let updateLinks=document.querySelectorAll(sel);
for(let i=0; i<updateLinks.length; i++){
updateLinks[i].addEventListener("click", function(){
//click 이벤트가 일어난 바로 그 요소의 data-num 속성의 value 값을 읽어온다.
const num=this.getAttribute("data-num"); //댓글의 글번호
document.querySelector("#updateForm"+num).style.display="block";
});
}
}
function addDeleteListener(sel){
//댓글 삭제 링크의 참조값을 배열에 담아오기
let deleteLinks=document.querySelectorAll(sel);
for(let i=0; i<deleteLinks.length; i++){
deleteLinks[i].addEventListener("click", function(){
//click 이벤트가 일어난 바로 그 요소의 data-num 속성의 value 값을 읽어온다.
const num=this.getAttribute("data-num"); //댓글의 글번호
const isDelete=confirm("댓글을 삭제 하시겠습니까?");
if(isDelete){
// sy_util.js 에 있는 함수들 이용해서 ajax 요청
ajaxPromise("comment_delete.do", "post", "num="+num)
.then(function(response){
return response.json();
})
.then(function(data){
//만일 삭제 성공이면
if(data.isSuccess){
//댓글이 있는 곳에 삭제된 댓글입니다를 출력해 준다.
document.querySelector("#reli"+num).innerText="삭제된 댓글입니다.";
}
});
}
});
}
}
function addReplyListener(sel){
//댓글 링크의 참조값을 배열에 담아오기
let replyLinks=document.querySelectorAll(sel);
//반복문 돌면서 모든 링크에 이벤트 리스너 함수 등록하기
for(let i=0; i<replyLinks.length; i++){
replyLinks[i].addEventListener("click", function(){
if(!isLogin){
const isMove=confirm("로그인이 필요 합니다. 로그인 페이지로 이동 하시겠습니까?");
if(isMove){
location.href=
"${pageContext.request.contextPath}/users/loginform?url=${pageContext.request.contextPath}/cafe/detail?num=${dto.num}";
}
return;
}
//click 이벤트가 일어난 바로 그 요소의 data-num 속성의 value 값을 읽어온다.
const num=this.getAttribute("data-num"); //댓글의 글번호
const form=document.querySelector("#reForm"+num);
//현재 문자열을 읽어온다 ( "답글" or "취소" )
let current = this.innerText;
if(current == "답글"){
//번호를 이용해서 댓글의 댓글폼을 선택해서 보이게 한다.
form.style.display="block";
form.classList.add("animate__fadeInLeft");
this.innerText="취소";
form.addEventListener("animationend", function(){
form.classList.remove("animate__fadeInLeft");
}, {once:true});
}else if(current == "취소"){
form.classList.add("animate__fadeOut");
this.innerText="답글";
form.addEventListener("animationend", function(){
form.classList.remove("animate__fadeOut");
form.style.display="none";
},{once:true});
}
});
}
}
function addUpdateFormListener(sel){
//댓글 수정 폼의 참조값을 배열에 담아오기
let updateForms=document.querySelectorAll(sel);
for(let i=0; i<updateForms.length; i++){
//폼에 submit 이벤트가 일어 났을때 호출되는 함수 등록
updateForms[i].addEventListener("submit", function(e){
//submit 이벤트가 일어난 form 의 참조값을 form 이라는 변수에 담기
const form=this;
//폼 제출을 막은 다음
e.preventDefault();
//이벤트가 일어난 폼을 ajax 전송하도록 한다.
ajaxFormPromise(form)
.then(function(response){
return response.json();
})
.then(function(data){
if(data.isSuccess){
/*
document.querySelector() 는 html 문서 전체에서 특정 요소의
참조값을 찾는 기능
특정문서의 참조값.querySelector() 는 해당 문서 객체의 자손 요소 중에서
특정 요소의 참조값을 찾는 기능
*/
const num=form.querySelector("input[name=num]").value;
const content=form.querySelector("textarea[name=content]").value;
//수정폼에 입력한 value 값을 pre 요소에도 출력하기
document.querySelector("#pre"+num).innerText=content;
form.style.display="none";
}
});
});
}
}
</script>
</body>
</html>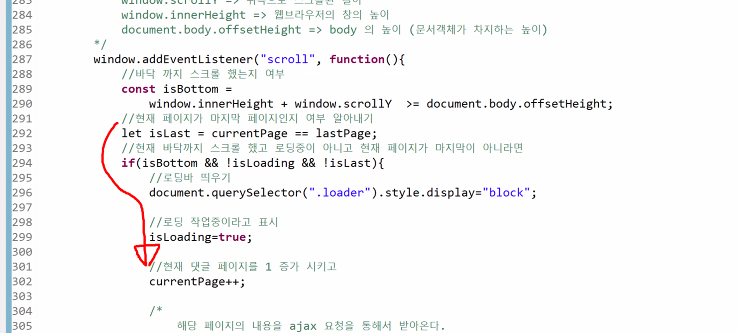
- 스크롤+창 크기를 비교한 결과로 화살표가 돌아가는 모양을 출력하는데,
창의 상하 폭이 일정 크기 이하일 경우 이 if문을 통과하게 되어 문제 발생!
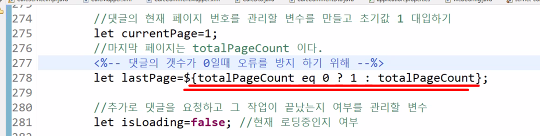
- totalPageCount를 출력하는 내용 수정하기
- 0이면 1을 찍어두고, 그 외의 경우는 totalPageCount를 출력하도록 하기.
* 자료실(File) 기능 가져오기
- view 페이지, mapper를 가져오고,
패키지 5개 복사해서 패키지명을 rename 해주기
- fileService에 경로가 resources 폴더아래 upload 있는것을 확인!
- webconfig 에 interceptor 설정
- FileDto → @Alias("fileDto") 추가
- application.properties → mybatis.type-aliases-package 에 fileDto 패키지명추가
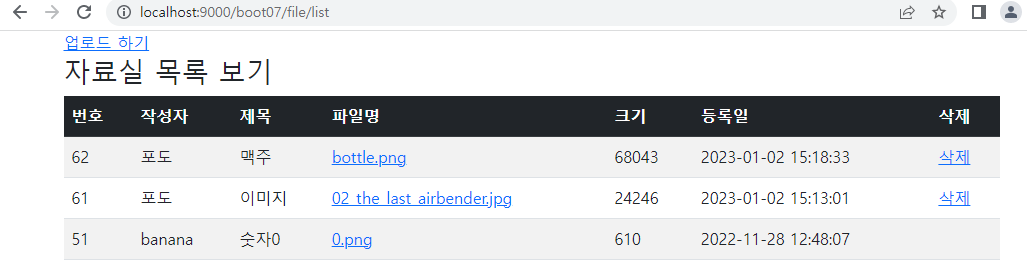
- 똑같이 File 기능 추가 가능
- 트랜잭션 기능 Boot로 사용하기! (shop)
- error, shop 뷰페이지 가져오기
- shop 관련 패키지 4개 가져와서 패키지명 변경
- ShopMapper 가져오기
- 2개 Dto에 각각 alias 달아주기
- application.propertiers 들어가서 alias 명 추가해주기
mybatis.type-aliases-package= com.sy.boot07.gallery.dto, com.sy.boot07.users.dto,
							com.sy.boot07.cafe.dto, com.sy.boot07.file.dto, com.sy.boot07.shop.dto
- 엔터치면 인식되지 않는다 ㅠ 한줄로 적어주어야 한다.
- 하나하나 추가해주기 귀찮으면 그냥 이렇게 작성할 수도 있다!
- Spring이 알아서 하위 패키지를 전부 뒤져서 @Alias를 찾는다.
- 트랜잭션 사용 시, spring Boot 에서는 이 2가지 설정을 할 필요가 없다. 이미 설정이 들어가 있다.
- @Transactional 어노테이션만 들어가면 된다.
ShopServiceImpl
package com.sy.boot07.shop.service;
import java.util.List;
import javax.servlet.http.HttpServletRequest;
import org.springframework.beans.factory.annotation.Autowired;
import org.springframework.stereotype.Service;
import org.springframework.transaction.annotation.Transactional;
import org.springframework.web.servlet.ModelAndView;
import com.sy.boot07.exception.DeliveryException;
import com.sy.boot07.shop.dao.OrderDao;
import com.sy.boot07.shop.dao.ShopDao;
import com.sy.boot07.shop.dto.OrderDto;
import com.sy.boot07.shop.dto.ShopDto;
@Service
public class ShopServiceImpl implements ShopService {
@Autowired private ShopDao shopDao;
@Autowired private OrderDao orderDao;
@Override
public void getList(ModelAndView mView) {
//상품 목록
List<ShopDto> list=shopDao.getList();
//ModelAndView객체에 list라는 키 값으로 담는다.
mView.addObject("list", list);
}
/*
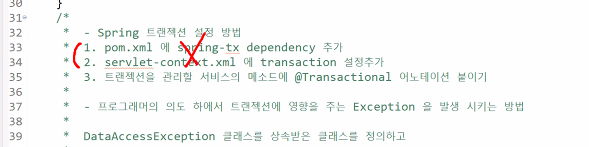
* - Spring Boot 트랜잭션 설정 방법
*
* 트랜잭션을 관리할 서비스의 메소드에 @Transactional 어노테이션 붙이기
*
* - 프로그래머의 의도 하에서 트랜잭션에 영향을 주는 Exception을 발생시키는 방법
*
* DataAccessException 클래스를 상속받은 클래스를 정의하고
* 예) class MyException extends DataAccessException{ }
*
* throw new MyException("예외 메시지");
*
* 예외를 발생시킬 조건이라면 위와 같이 예외를 발생시켜서
* 트랜잭션이 관리되도록 한다.
*/
@Transactional
@Override
public void buy(HttpServletRequest request, ModelAndView mView) {
//구입자의 아이디
String id=(String)request.getSession().getAttribute("id");
//1. parameter로 전달되는 구입할 상품 번호
int num=Integer.parseInt(request.getParameter("num"));
//2. 상품의 가격을 얻어온다.
int price=shopDao.getPrice(num);
//3. 상품의 가격만큼 계좌 잔액을 줄인다.
ShopDto dto=new ShopDto();
dto.setId(id);
dto.setPrice(price);
shopDao.minusMoney(dto);
//4. 가격의 10%를 포인트로 적립한다.
shopDao.plusPoint(dto);
//5. 재고의 개수를 1 줄인다.
shopDao.minusCount(num);
//6. 주문 테이블(배송)에 정보를 추가한다.
OrderDto dto2=new OrderDto();
dto2.setId(id); //누가
dto2.setCode(num); //어떤 상품을
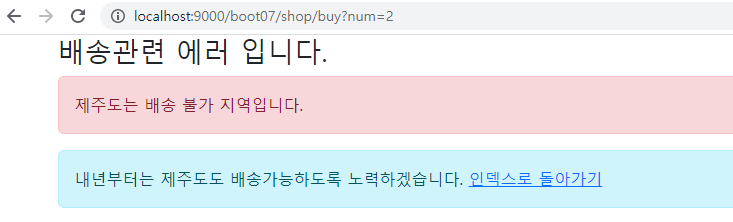
//클라이언트가 입력한 배송 주소라고 가정
String addr="제주도 역삼동";
//가상의 테스트
if(addr.contains("제주도")) {
throw new DeliveryException("제주도는 배송 불가 지역입니다.");
}
dto2.setAddr(addr);//어디로 배송할지
orderDao.addOrder(dto2);
}
}
- Boot에서는 pom.xml에 transaction관련 디펜던시를 따로 추가하지 않아도 된다.
'국비교육(22-23)' 카테고리의 다른 글
| 61일차(1)/Spring Boot(10) : file, gallery 게시판 파일 저장경로, 다운로드 기능 수정 / Boot 기능 활용 (0) | 2023.01.03 |
|---|---|
| 60일차(2)/Spring Boot(9) : 파일 저장경로 수정 / Boot 기능 활용 (0) | 2023.01.03 |
| 59일차(3)/Spring Boot(7) : war 파일 실행 / Boot에서 war파일 생성(1) (0) | 2022.12.30 |
| 59일차(2)/Spring Boot(6) : WebConfig 설정, yml 파일 작성하기 (0) | 2022.12.30 |
| 59일차(1)/Spring Boot(5) : Boot에서 jsp 사용하기 (0) | 2022.12.30 |